


Plot titles
Function Name(s) :
Most maps will have a title block of some form so that the map can be appropriately labelled for future reference. Title blocks may consist of many different features including:
- lines
- static text that doesn't change from one map to the next
- dynamic (prompted for) text that changes from one map to the next
- special user defined symbols
- images (such as a company logo)
- special elements such as date, scale, scale bar and other
- pattern legends
The graphics design environment provided for managing title blocks provides the tools to interactively create title blocks with any or all of these features. Title blocks are used by the Process Map function and are positioned relative to the border that is drawn on the map. If a border is not used in processing a map, it is not possible to place a title block on the map.
All titles are defined in the SSI_PLOTTING:titles.ssi file. The Plot Titles function provides an interactive graphics viewing and editing environment to create, modify and delete title definitions. Each title that is created, or selected for modification is displayed in a graphics viewport. Changes may be made to the title definition either by viewing and modifying the title properties in a dialog form or through mouse actions to copy, move, delete and insert new title block items.
While working in this environment you may choose to display, create, modify and delete other sheet setup features such as borders, drawing areas and grids by choosing the menu for the appropriate feature.
The following commands related to title blocks are available.
| Command | Description |
|---|---|
| Borders | Displays the menu for managing border definitions |
| Grids | Displays the menu for managing grid definitions |
| New | Allows you to create a new title block definition |
| Select | Allows you to select an existing title block definition and display it in a new graphics viewport |
| Copy | Allows you to create a new title block definition by copying an existing title block and displaying it in a new viewport |
| Delete | Allows you to delete a title block definition |
| Save | Allows you to save all title block definitions to the SSI_PLOTTING:titles.ssi file |
| Properties | Allows you to display the properties of borders, drawing areas, grids or title blocks in a dialogue form for viewing or editing purposes |
| Insert/Edit | Displays the menu containing functions to insert new title block items or to edit existing title block items |
| Snap Grid | Allows you to display or modify the snap grid properties |
| Snap On | Displays a snap grid in the active viewport to aid in border definition |
| Snap Off | Erases a snap grid from the active viewport |
| Pan | Allows you to move the image of the drawing area around by using the mouse to define the amount of displacement |
| Window In | Allows you to enlarge a portion of the displayed drawing area by using the mouse to define the region of interest |
| Window Out | Undoes the effect of the most recent Window In operation |
| Zoom In | Allows you to enlarge the displayed part of the drawing area by a factor of 2 |
| Zoom Out | Allows you to reduce the size of the displayed part of the drawing area by a factor of 2 |
| Zoom All | Displays the entire drawing area definition in the active viewport. |
| EXIT | Allows you to exit from the Plotting Sheet Setup module without saving any changes |
| EXIT & SAVE | Allows you to exit from the Plotting Sheet Setup module and ensures that any changes are saved. |
Helpful Hints
When using the Title Block management functions for the first time you will find it easiest to select an existing title block and examine its properties. You can modify the properties of the title block to suit your requirements.
Creating a new title block can be a lengthy task, especially if the title block is very complex, the tools provided help to simplify this task considerably. As with any task, some preliminary planning can greatly improve productivity and the end result. To simplify the task of creating the title block it is best to create a sketch of the title block with lines, symbols, text, etc. in the required locations. This sketch, with approximate dimensions, can then be used to guide the process of designing the title block.
All features in the title block have X and Y coordinate values that are relative to the title block origin. The title block origin is at the lower left corner of the title block itself, regardless of in which corner of the map sheet the title will be placed. This fact is the single most important point to remember about title blocks.
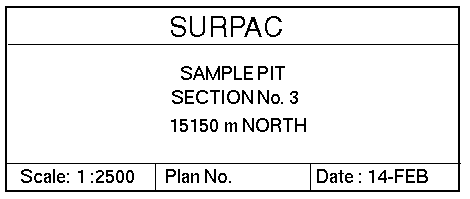
A typical title block contains:
- lines,
- static text, Surpac Report for example,
- prompting text, SAMPLE PIT for example that is prompted for when the map is processed,
- special values such as the date which is determined when the map is processed.
Select title block
This function permits you to select an existing title block definition and display it in a graphics viewport. After displaying the title block in the viewport you may examine or alter its properties using a form. You may also insert, edit, delete or interactively move any item in the title block.
To run this function: In the Plot Sheet Setup window, choose Title Blocks > Select, or...
- With the Plot Sheet Setup window open, in the Function Chooser, type PLOT SELECT TITLE, and press ENTER.
Fields on the Select plotting title form
Title ID
Choose the title block that you wish to display in a graphics viewport.
Border ID, Draw Area ID
Hardcopy maps typically have a border and drawing area with the title block located relative to a corner of the border. To place the title block in context, you must choose the border and drawing area that are to be used to display the title block in the graphics viewport.
Even though you may choose a particular border and drawing area here to display the title block, this has no impact on the border and drawing area that may be used when using the Process Map function. The sheet size that is used to display the title block definition in the graphics viewport is the preferred sheet size of the chosen drawing area.
Result
The title block that you have chosen is displayed in a graphics viewport with the requested border and drawing area.
New title block
This function allows you to create a new title block definition. At their most basic, title block definitions require you to define the title block dimensions and the corner of the map sheet in which the title block will be located.
To run this function: In the Plot Sheet Setup window, choose Title Blocks > New, or...
- With the Plot Sheet Setup window open, in the Function Chooser, type PLOT NEW TITLE, and press ENTER.
Fields on the New title properties form
Title blocks are reasonably complex and so there is a suite of functions that permit you to add to the basic title block created by the inputs on the New title properties form.
Title ID
The name of the new title block must be entered here. You may use any characters in the name excluding the comma (,) character. The title block name must be unique as it is used later to select the title block by name from the list of known title blocks.
Title block names are case sensitive.
Title description
The title description is optional and is used to give a more verbose description of the purpose for which the title block is used.
Border ID, Draw Area ID
Hardcopy maps typically have a border and drawing area with the title block located relative to a corner of the border. To place the title block in context, you must choose the border and drawing area that are to be used to display the title block in the graphics viewport.
Even though you may choose a particular border and drawing area here to display the title block, this has no impact on the border and drawing area that may be used when using the Process Map function. The sheet size that is used to display the title block definition in the graphics viewport is the preferred sheet size of the chosen drawing area.
Title block origin
Title blocks are located relative to a corner of the border. This requires that the sheet corner and offsets from that corner to locate the title block origin be defined.
Corner
The sheet corner in which the title block is to be placed may be defined as:
- lower left
- upper left
- lower right
- upper right
If, after having created a title block, you wish to locate the title block in a different corner of the border you simply display the title block properties and change the corner. This will cause the entire title block and its constituent items to be moved to the desired corner.
X offset, Y offset
The offsets from the corner of the border in which the title block is to be placed to locate the origin of the title block are defined in centimetre units.
Regardless of the title block size, with offsets of 0,0 the title will be precisely positioned in the corner of the border no matter in which corner of the border the title block is placed. For all items placed in the title block, the lower left corner of the title block then becomes the origin (0,0) for the coordinates to place each title block item.
The position of the title block with respect to the corner may be changed by altering the X and Y offset values. These offsets comply with the cartesian coordinate system convention with positive values to the right and up and negative values to the left and down.
You should avoid using offset values that place the title block outside the border.
Title block size and orientation
When creating the basic title block you must define the size and orientation of the title block to which you later add additional text, symbols etc.
X size, Y size
These values define the dimensions and, together with the offsets described above, the location of the title block origin with respect to the reference corner of the border. The X and Y sizes are in centimetre units.
For a horizontally aligned title block the X dimension should be greater than the Y dimension. For a vertically aligned title block the Y dimension should be greater than the X dimension.
Priority
Each item, line, text, symbol, etc. that is drawn on a map has a priority that is used to determine how items that clash should be drawn, or omitted. The value entered here is the priority of the title block region itself. It is important that the highest possible priority (125) is assigned to the title block to prevent string and note file data plotted on the map from intruding into the region reserved for the title block.
Font options
Name
Select the name of the font used to display prompting text for this entity. All fonts installed on the system are available, as well as the Surpac defaults for variable and fixed width fonts which can be used by selecting Default or DefaultFixed respectively.
Bold
Check this box for bold text.
Italic
Check this box for text in italics.
Underline
Check this box for underlined text.
Note: There is no text height provided in the font options, as is done on other forms with font options. The font options set here are common to all prompting lines, but the height of these is set separately for each line (see below). There are some minor known issues with fonts and the plot previewer.
Orientation
The orientation is used to determine the orientation of the prompting title lines in the title block. These lines are defined in the scrolling region on this form. For a horizontally aligned title block a value of 0 is appropriate as this will make the text readable from the bottom edge of the map sheet. For a vertically aligned title block a value of 90 is appropriate as this will make the text readable from the right edge of the map sheet.
Pen number
The lines that are drawn to delineate the extent of the title block are drawn with a specified pen number. Each pen is associated with a colour through a pen file that can be easily modified to suit your requirements.
Title block prompting lines
When processing a map it is typical that a description of the map contents must be entered to correctly label the map. This can be achieved by using prompting title lines. These lines can be defined here or, by using the Plot Insert Title Prompting Text function on the INSERT / EDIT menu.
Prompting title lines are presented in the title block, while the title block is being designed, in the form [prompt text]. This is to aid you in determining precisely where the various items of prompting text will be positioned.
These prompting title lines can be positioned anywhere in the title block and the height, maximum length and pen number can be defined to achieve the desired results. You can use at most 50 prompting title lines in a title block.
You may find that it is easier to insert the prompting title lines after the basic rectangle of the title block has been positioned by using the Plot Insert Title Prompting Text function.
Prompt
This is the prompt that will be presented when processing a map that uses this title block.
X position, Y position
The X and Y positions of the text that will be placed in the title block are relative to the lower left corner of the title block with right and up being positive and left and down being negative. The X and Y coordinates are in centimetre units.
Text height
This is the height, in centimetres, of the text as it will be placed in the title block. The actual font is controlled by the title block font options. (see above)
Length
This is the maximum length in cm of the text you will be permitted to enter in response to this prompt. If the text provided is longer than allowed, it will be truncated to fit within the bounds of the prompting line. Previous to version 5.2, this length was given as the number of characters, but since variable width fonts are now in use, the number of characters is not a useful measure of the length of the text in hardcopy. If plotting entities created with a version earlier than 5.2 are loaded, the number of characters will be used to approximate the maximum length in cm. This is an approximation, and may require slight adjustment to the title block via the Plot Sheet Setup window.
Pen
This is the pen number that will be used to draw the text entered in response to this prompt when the map is being processed.
Complete the NEW TITLE PROPERTIES form and choose Apply to present the new title block definition in a graphics viewport. A line is drawn around the perimeter of the title block with the specified pen number. Any prompting title lines that may have been defined will also be displayed in the appropriate positions in the title block.
To add further items to the title block use the functions on the INSERT / EDIT menu.
Copy title block
You use this function to create a new title block by copying an existing title block. You might choose to use this method if you want to create a title block definition that is only slightly different to an existing title block. You could also use this method as the first step in creating a completely new title block.
To run this function: In the Plot Sheet Setup window, choose Title Blocks > Copy, or...
- With the Plot Sheet Setup window open, in the Function Chooser, type PLOT COPY TITLE, and press ENTER.
Fields on the Copy title properties form
| Field | Description |
|---|---|
| Existing Title ID | The title block to copy. |
| New Title ID |
The name of the new title block. The name must be unique. Use letters or numbers only, but not other characters such as the comma character. Title block names are case-sensitive. |
| Title description | Optional. A short description of the title block or the purpose of the title block. |
| Border ID |
The border to use when the preview of the title block is displayed in the Plot Sheet Setup window.
|
| Draw Area ID |
The draw area to use when the preview of the title block is displayed in the Plot Sheet Setup window.
|
| New Properties | |
| Corner | The corner of the draw area in which the title block is located. A title block is created inside a draw area which is inside a border. When the corner value is lower right (and Origin Offsets both set to zero), the title block is created level with the lower right corner of the Draw Area ID. |
| X Offset | The number of centimetres that the lower left corner of the title block is offset from the Corner in the X dimension. A negative value is allowed. |
| Y Offset | The number of centimetres that the lower left corner of the title block is offset from the Corner in the Y dimension. A negative value is allowed. |
| Font options | The font face of the text in each of the prompting lines in the title block, and options to set whether the text is bold, italic, or underlined. |
| Protected size |
The size of the protected area of the title block. The protected area is the part of the title block to which Surpac adds a white background image. The white background image appears above any data in the plot. Therefore the protected area is effectively the size of the title block.
|
| Priority |
An integer between 0 and 125 that determines which lines overwrite any text in the legend. When a line and some text would be drawn in the same space, the entity that has the higher priority is drawn. |
| Pen | The pen number that defines the colour to use for the lines of the title block, and the border around the title block. |
| Scale Factor | A multiplying factor that you can use to increase or decrease the size of the title block in both dimensions. A scale factor of 1 does not change the size of the title block. A scale factor of 2 doubles the size of the title block. |
| Text orientation | The amount of rotation of the title block. |
| Title Block prompting lines | |
| Prompt |
The line of text to display as a prompt to the person who is creating a plot with this title block. You can use this feature to encourage the person creating a plot to enter the name of a file that is relevant to the plot. To create more than one prompt, press TAB, and enter the additional prompt on the second line. |
| X position and Y position | The position, relative to the corner of the title block, of the text that the person creating the plot types in response to the prompt. X position and Y position are in centimetres. |
| Text height | The height of the text in centimetres. |
| Length | The length of the text in centimetres. If the text is longer than Length, the text is truncated. |
| Pen | The pen number that defines the colour of the text. |
 Note: When you create a plot, you can choose the border and draw area to use in the plot. The
  Tip: It is a good idea to set
 Output
The new title block is created, but it is not yet saved. To save it, choose Title Blocks > Save.
 Messages
Delete title block
This function allows you to delete existing title block definitions from the list of known title blocks.
To run this function: In the Plot Sheet Setup window, choose Title Blocks > Delete, or...
- With the Plot Sheet Setup window open, in the Function Chooser, type PLOT DELETE TITLE, and press ENTER.
Fields on the Delete plotting title form
Title ID
Choose the name of the existing title definition that you wish to delete.
Choose Apply to delete the plotting title block. If you make a mistake and delete the incorrect title block definition, you may choose EXIT to leave the Plotting Sheet Setup module without saving the changes that have been made.
If the title block deleted is presently displayed in a viewport, that viewport will be destroyed. The border and drawing displayed with the grid ARE NOT destroyed though and they can be displayed again if required.
Save title block
This function allows you to save changes that you have made to the plotting title block definitions. The title block definitions are saved in the SSI_PLOTTING:titles.ssi file.
To run this function: In the Plot Sheet Setup window, choose Title Blocks > Save, or...