


GuidoFiller
Overview
GuidoFiller objects are often used in panels to act as place holders for the layout manager when it places objects into positional slots on the form. GuidoFillers can also be configured to take up a certain amount of width or height in the form to help the aesthetics of the form.
Synopsis
GuidoFiller Name Body
Description
A GuidoFiller is an object that is normally only used to satisfy one of the current Layout Manager rules or to insert space into a form. When using a CentreLine Layout that requires Guido objects to occupy every slot in the layout, fillers are used as place holders to satisfy this condition. For example if on the left hand side of the centre line you required no label next to a field then you would have to insert a filler object on the left to fill the spot in the layout, otherwise the field would appear on the left of the centre line. See Layout Managers for further information.
The other use of GuidoFillers is to take up visible space on the form. By specifying that the filler has width and/or height that amount of space will be taken up on the form. You may want to do this to line up items on the form, separate objects on the form for legibility, put in double spacing, etc. If you are using the Multi Lingual Translator for translating text labels on a form then care must be taken when using fillers for spacing reasons as text label in different languages will be of a different length.
Arguments
Name Name is a unique identifier that you assign and is used to differentiate this object from other Guido objects in the form definition.
Body The body of a filler is often empty and so begins with an opening curly brace and ends with a closing curly brace. The curly braces {} are required as a place holder for this argument. The only switches normally used with a filler are the -width and -height switches.
Switches A GuidoFiller will understand the common Guido switches for objects and containers. See the description on the layout managers below for detailed information on panel layouts.
Common Guido switches reference
Examples
Example 1
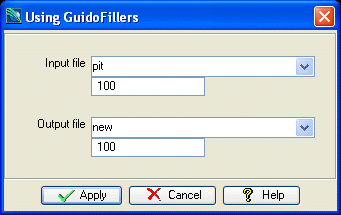
This example form demonstrates how to achieve a specific layout of components by inserting GuidoFillers to both occupy a Layout Manager slot and to provide spacing on the form to achieve the desired layout.
Note the use of the topFillers to give the left and right side of the form a particular width and also to leave some space at the top of the form before the first field. The middleFillers and bottomFillers also create space between sections of the form. Notice that these fillers are used in pairs because the CentreLine Layout Manager requires an object for both sides of the centre line.
# GuidoFiller Example 1
# define the form
set formDef {
  GuidoForm form {
    -label "Using GuidoFillers"
    -default_buttons
    GuidoFiller topFillerA {
      -width 7
      -height 1
    }
    GuidoFiller topFillerA {
      -width 22
    }
    GuidoFileBrowserField inputLoc {
      -label "Input file"
      -width 20
      -file_mask "*.str"
      -link inputId
      -null false
    }
    GuidoFiller leftSideFiller1 {}
    GuidoField inputId {
      -width 10
      -format integer
      -null false
    }
    GuidoFiller middleFillerA {
      -height 1
    }
    GuidoFiller middleFillerB {}
    GuidoFileBrowserField outputLoc {
      -label "Output file"
      -width 20
      -file_mask "*.str"
      -link outputId
      -null false
    }
    GuidoFiller leftSideFiller2 {}
    GuidoField outputId {
      -width 10
      -format integer
      -null false
    }
    GuidoFiller bottomFillerA {
      -height 1
    }
    GuidoFiller bottomFillerB {}
  }
}
# Create and run the form
SclCreateGuidoForm formHandle $formDef {}
$formHandle SclRun {}
|
See Also
Guido
GuidoForm
GuidoPanel
Layout
Managers
Common guido switches