Introduction
Surpac
GEOVIA Surpac™ is the world’s most popular geology and mine planning software, supporting open pit and underground operations and exploration projects in more than 110 countries. The software delivers efficiency and accuracy through ease-of-use, powerful 3D graphics, and workflow automation that can be aligned to company-specific processes and data flows.
Surpac addresses all the requirements of geologists, surveyors, and mining engineers in the resource sector and is flexible enough to be suitable for every commodity, orebody, and mining method. Its multilingual capabilities allow global companies to support a common solution across their operations.
Surpac must be installed on the local computer and your user customisable files saved locally in the share folder. Working files can be saved locally or to a network location. It is recommended that you back up both your data and user customised files regularly.
Overview
This document is designed to help new users install Surpac and start using the software. More detailed training information is available from within the software and from your local support office.
Requirements
Before proceeding with this tutorial, ensure you have the following items:
- A copy of Surpac v6.6 for installation.
- A suitable computer with a DVD drive.
- The data set accompanying this tutorial.
This is usually installed from a DVD, but you can also download the software from the http://www.GEOVIAsupport.com web site.
|
|
Minimum | Recommended |
|---|---|---|
|
Windows |
Microsoft Windows® 32-bit Professional, Enterprise, Ultimate |
Microsoft Windows® 64-bit Professional, Enterprise, Ultimate |
|
Memory |
4GB |
8GB (3.xGB max for Surpac 32-bit process)
|
|
CPU |
i5 2.3Ghz quad core |
i7/Xeon 2.2Ghz + quad core |
| HDD | 1 x 500GB 7200RPM SATAII | 500GB 2700RPM SATA or SAS 10,000RPM (data) + SDD (for Windows and Applications) |
|
Graphics card |
Nvidia NVS 420/Q1000m |
Nvidia Quadro Q2000/m or Q4000/m |
 Note: 8GB allows 3.2+ Windows without paging.
Document conventions
Typographical conventions
Some text in this manual has special formatting to identify it as a particular element of information. The following list describes the different formats and their meanings:
| Text Format | Meaning |
|---|---|
|
<Bold Italic> |
Text or data that varies with each input is shown in italic font and enclosed in angle brackets. Some examples are installation directories, dates, names and passwords. When you substitute the text for the variable, do not include the brackets. For example: <password> requires you to substitute a password in place of ‘<password>’. |
| Italics |
A word or phrase to which the author wants to give emphasis. For example: you must select an item from the list to continue. |
| Bold |
This typeface indicates one of the following:
For example: Open pit1.str into Graphics. |
Keyboard conventions
| Key Combination | Meaning |
|---|---|
|
<key>+<key> |
Press and hold down the first key, then press the second key. For example: CTRL+Z means hold the CTRL key down, then press Z. |
Menu conventions
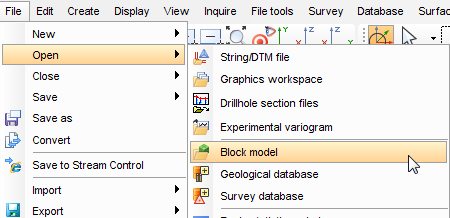
In this documentation, the following example demonstrates the syntax used for menus and submenus:
Choose File > Open > Block model.
This means click the File menu, move the pointer over the Open command, and select Block model on the submenu.
Mouse conventions
| Action | Description |
|---|---|
|
Click |
Quickly press and release the left mouse button without moving the mouse. |
|
Right-click |
Press and release the right mouse button without moving the mouse. |
|
Double-click |
Without moving the mouse, click the left button twice rapidly. |
|
Drag and drop <an object> |
With the pointer over the object, press and hold down the left mouse button to select the object. Move the mouse until the pointer is in the position you want and then release the mouse button. |
|
Drag |
Press and hold down the left mouse button. Then move the mouse in the direction that the text specifies. |
|
Right drag |
Press and hold down the right mouse button. Then move the mouse in the direction that the text specifies. |
|
Rotate |
Use your finger to make the wheel button roll. Move it forward, that is in a clockwise direction, or backward, that is in an anticlockwise direction. |
Forms
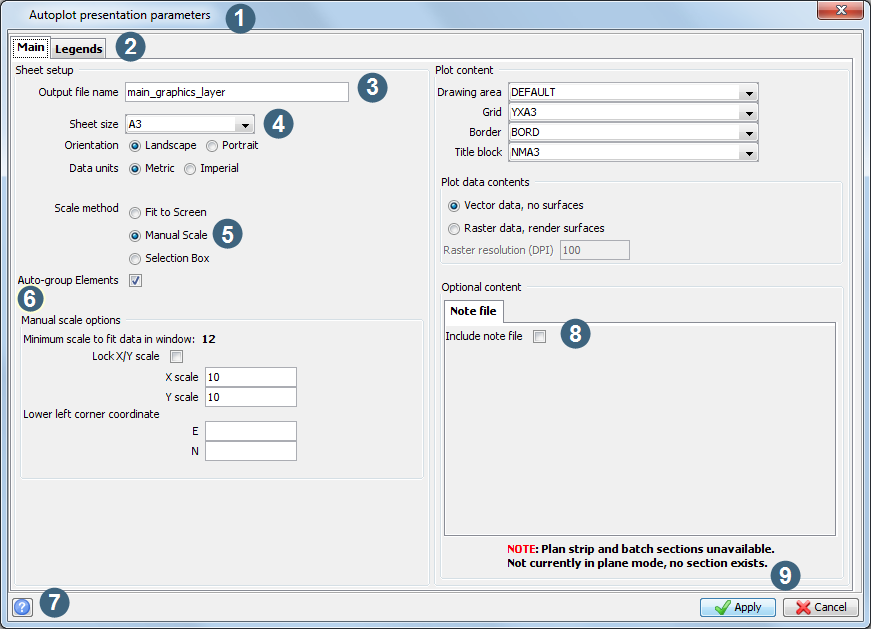
Forms contain elements that you will use to provide information to Surpac:
| Element | Description | Example |
|---|---|---|
|
1. Title |
Title of the form. |
|
|
2. Tab |
Labelled group of options used for many similar kinds of settings. |
|
|
3. Text box |
Rectangular box in which you can type text. If the box already contains text, you can select that text and edit it. |
|
|
4. Combo box or Drop-down list |
Closed version of a list box with an arrow next to it. Clicking the arrow opens the list. |
|
|
5. Radio button or Option button |
Round button you can use to select one of a group of mutually exclusive options. |
|
|
6. Label |
Text attached to any option, box, button, or to any other element of a window or form. |
|
|
7. Help |
Context-sensitive help button. |
|
|
8. Check box |
Square box that you select or clear to turn an option on or off. |
|
|
9. Button |
Rectangular or square button that initiates an action. Buttons have text labels to indicate their purpose. |
|