


Getting started
Installing Surpac from a DVD
Task: Install Surpac
- Insert the DVD into your computer’s DVD drive.
- To install a 32-bit version of Surpac, click the edition you want to install.
- To install a 64-bit version of Surpac:
- Click Install 64-bit version.
- Click the edition you want to install.
- Click Next.
- Choose to accept the licence agreement , and click Next.
- Click Next to accept the default directory, or click Change to select and installation directry.
- Check that the Sentinel Service Driver is set to be installed on your local hard drive, and click Next.
- To participate in the product development program, leave the I would like to participate and Provide contact information check boxes selected, and click Next.
- Click Install.
- When Surpac is installed, click Finish.
The installation menu appears.
 Note: If the installation menu does not appear, use Windows Explorer to navigate to the DVD and double-click autorun.exe.

The GEOVIA Surpac Setup Wizard appears.
The GEOVIA Surpac Setup Wizard appears.
Note: You must accept the terms of the license agreement or the installation will not continue.
Note: GEOVIA recommends that you use the default locations.
Note: GEOVIA would appreciate your participation to help us improve Surpac. This feature only collects details of the functions you use. Information about your data is not recorded.
Note: If Microsoft .NET Framework 4 or Direct X 9.0c are not installed on your computer, the installer for the missing component appears at the end of the Surpac installation.
Starting Surpac
Task: Start Surpac
- Double-click the Surpac icon
 on your desktop.
 - Click Start, select All Programs, and GEOVIA, and GEOVIA Surpac 6.6.
Start Surpac, using either of these methods:
Licensing Surpac
The instructions below are for installing a single user licence. In order to proceed, you will need:
- Surpac v6.6 installed, as previously described
- a USB or parallel sentinel
- a valid token number or licence file
If you do not have Surpac or a sentinel, please contact your local support office.
If you do not have a valid token number or licence file you can use the self-service licensing function when you start Surpac.
Task: License Surpac
If you already have a token number, or a licence file, complete the following steps. Otherwise, use the self-service licensing method that is described in the second procedure.
License Surpac using a token number and a sentinel
- Ensure that your sentinel is inserted into an appropriate port on your computer.
- Start Surpac.
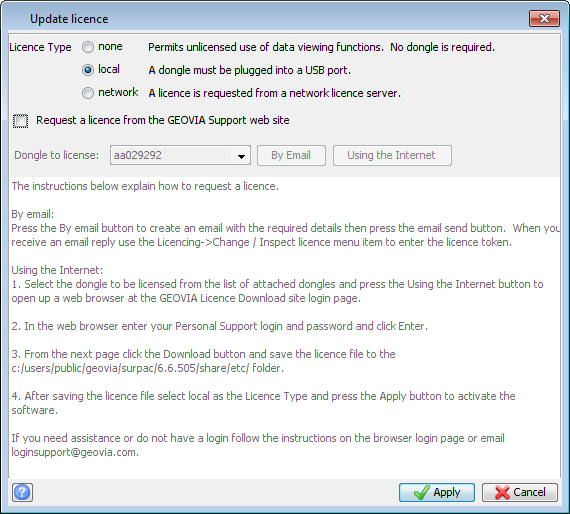
- Select local, and click Apply.
- Enter the token number, and click Validate.
- Click Apply.
-
Choose File > Licencing > Change/Inspect licence.
-
After reviewing or updating the licence details, click Apply.
If the Surpac interface is displayed, you already have a valid licence. Exit this procedure .
If you see the Update licence form, a valid licence does not exist. Follow the instructions within the form to request a licence from the GEOVIA Support web site, or to read the licence file.
The Update Licence Token form is displayed.
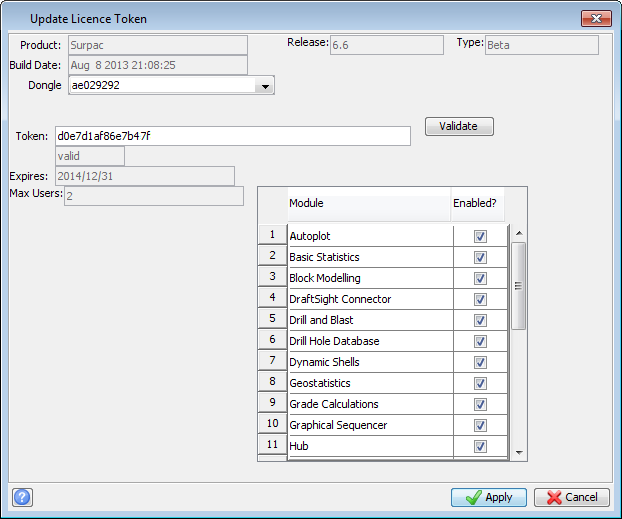
To review licence details, or type a new token number:
License Surpac using the self-service licensing service and a sentinel
Note: You must have an active Internet connection to use the self-service licensing feature.
- Ensure that your sentinel is inserted into an appropriate port on your computer.
- Start Surpac.
- Select Request a licence from the GEOVIA Support web site.
- If you have multiple sentinels attached to your computer, select the sentinel you want to use for the licence.
- Click Using the Internet.
- Enter your GEOVIA Support user name and password.
- Click Download.
- Save the tokens.ssi file in the Surpac SSI_ETC: directory.
- Select Local, and click Apply.
- Click Apply.
The Update licence form is displayed.
The login page for GEOVIAsupport.com opens
A new page opens.
The Update Licence Token form is displayed, pre-filled with the token number.
Setting the work directory
A work directory is the default directory for saving Surpac files. Files used in this tutorial are stored in the folder <shared_files>\demo_data\tutorials\introduction.
Where <shared_files> is the directory in which the Surpac shared files were installed.
In Windows 7, and Windows 8, the default path is
C: \Users\Public\GEOVIA\Surpac\66\demo_data\tutorials\introduction.
Task: Set the work directory
- In the Surpac Navigator, right-click the introduction folder.
- Select Set as work directory.
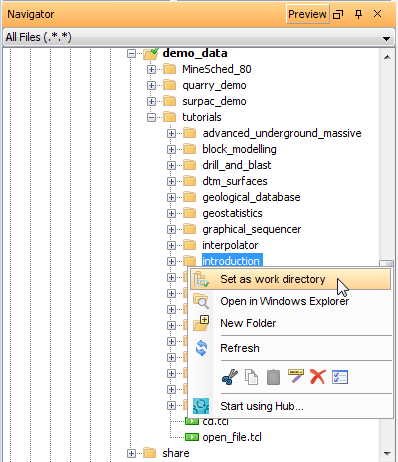
The name of the work directory is displayed in the title bar of the Surpac window.
Exiting Surpac
Task: Exit Surpac
Exit Surpac, using either of these two methods:
- Choose File > Exit.
- Click the
 button at the top right corner of the Surpac window.
Modifying the Surpac desktop icon
All of the files in this tutorial are stored in a specific directory. Each time you start Surpac, you will need to have the working directory set to that folder. The following steps describe how to create an icon that automatically sets the working directory when you start Surpac.
 Tip: You can create multiple Surpac desktop icons with different properties.
Task: Modify the Surpac icon so that the work directory is set automatically
- Move the pointer over the Surpac icon on your desktop.
- Hold down the right mouse button, drag and release.
- From the shortcut menu, select Copy Here.
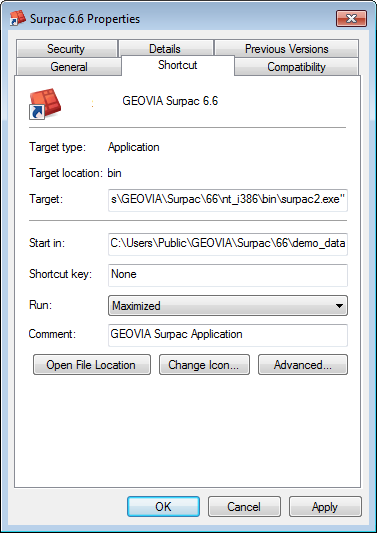
- Right-click the new Surpac icon, and select Properties.
- In the Start in field on the Shortcut tab, enter
- Click OK.
- Right-click the icon you have just modified, and select Rename.
- Type Surpac Introduction, and press ENTER.
- Double-click this icon to start Surpac.
A copy of the original icon is created:
<shared_files>\demo_data\tutorials\introduction
where <shared_files> is the folder where the Surpac shared files are installed.
Windows 7
Alternatively, you can use the F2 key as a shortcut.
The icon will appear with the new name.

The work directory is automatically set when Surpac starts up.