


Triangulate one segment to many segments
This function allows you to triangulate between one closed parent segment and many children. The children may either be closed segments or single points. The BIFURCATE ONE TO MANY function gives you less control over choosing the position of the line of bifurcation than the Bifurcate Union function, however the Bifurcate Union function only allows bifurcation from one parent to two children.
To run this function: Choose Solids > Triangulate > One segment to many segments, or...
 Notes:
- For the Bifurcate One To Many function to give an optimal result there must be a reasonable geometric match between the child segments and the portions of the parent segment to which they are to be triangulated. The function may also give a sub-optimal result if a bifurcation branch is at too great an angle to the parent segment.
- The results produced by the Bifurcate One To Many function depend on the particular value of the triangulate stitch algorithm you are using (this may be 0, 1, 2 or 3). If you do not obtain satisfactory results with the current stitch algorithm you can change it using the Toggle Stitch Algorithm function.
 Tip: While using the Bifurcate One To Many function, if you have problems selecting points and/or segments near triangles that are drawn on the screen, it may be because the triangles are being selected in preference to the points themselves.
The symptoms of this problem are the function cancelling unexpectedly or an inability to select the correct point.
If this occurs you are advised to remove the triangles from the screen using the Edges Off and Faces Off functions then perform the function as normal (obviously you must have the strings drawn on the screen to be able to select them), then recall the triangles to the screen using the Faces On and Edges On functions.
With the triangles temporarily removed from the screen you will find that point selection becomes much easier.
Tip: While using the Bifurcate One To Many function, if you have problems selecting points and/or segments near triangles that are drawn on the screen, it may be because the triangles are being selected in preference to the points themselves.
The symptoms of this problem are the function cancelling unexpectedly or an inability to select the correct point.
If this occurs you are advised to remove the triangles from the screen using the Edges Off and Faces Off functions then perform the function as normal (obviously you must have the strings drawn on the screen to be able to select them), then recall the triangles to the screen using the Faces On and Edges On functions.
With the triangles temporarily removed from the screen you will find that point selection becomes much easier.
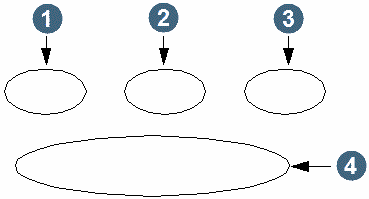
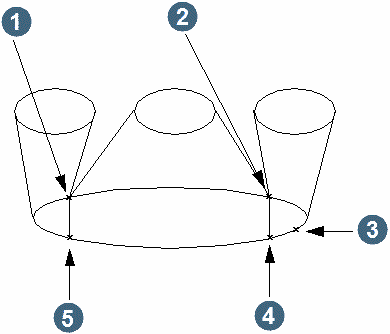
Diagrams (a) and (b) below show how the result trisolation is formed for an example with a parent segment and three child segments:
Diagram (a) Parent segment and three child segments
|
1. 3rd child segment 2. 2nd child segment 3. 1st child segment 4. parent segment |
Diagram (b) Splitting the parent segment and formation of resultant trisolation
|
1. 2nd break point for next child 2. 2nd break point for first child 3. point to define which part of the parent segment is to join with the first child 4. 1st break point for first child 5. 1st break point for next child |
As you can see from diagram (b), if you have chosen N children you must chose N-1 pairs of break points and one mark point to define which portion of the parent segment after the first split you want to allocate to join with the first child. A mark point is only required for the first child, all following allocations are made to be consistent with this first allocation. Note that the lines of bifurcation are all generally in the plane of the parent segment.
Note: When you select break points and mark points on the segments the function will snap to the closest point on the segment to the point you have selected and display a temporary marker.
To facilitate your choice of points you are therefore advised to use the DRAW Markers function to mark all the points in the strings.
You could use this function, for example, to model bifurcating ore bodies.
Function
Display only. The name of the function being executed.
Layer name
Display only. The name of the active layer is displayed. The active layer is the only layer you are able to modify.
Object
Enter the object number of the 3DM to be created.
Trisolation
Enter the trisolation number of the 3DM to be created.
Complete the DEFINE THE TRISOLATION TO BE CREATED form and choose Apply to display the NUMBER OF CHILDREN? form.
Enter number of children
Enter the number of children you require. A child may either be a closed segment or a single point.
Complete the NUMBER OF CHILDREN? form and choose Apply to display the prompt:
Select the first break point on the parent segment for the first child
Position the pointer and select the first break point on the parent segment for the first child.
Selecting this point causes the following prompt to be displayed:
Select the second break point on the parent segment for the first child
Position the pointer and select the second break point on the parent segment for the first child.
Selecting this point causes the following prompt to be displayed:
Select the portion of the parent segment to join with the first child
Position the pointer and select the portion of the parent segment to join with the first child.
Selecting this point displays the FIRST CHILD SEGMENT OR POINT? form.
Is the first child a segment or a point? (S/P)
Choose whether the first child is a segment or a point.
Complete the FIRST CHILD SEGMENT OR POINT? form and choose Apply to display the prompt:
Select the first child
Position the pointer and select the first child.
Selecting the first child causes the following prompt to be displayed:
Select the first break point on the parent segment for the next child
Position the pointer and select the first break point on the parent segment for the next child.
Selecting this point causes the following prompt to be displayed:
Select the second break point on the parent segment for the next child
Position the pointer and select the second break point on the parent segment for the next child.
Selecting this point displays the NEXT CHILD SEGMENT OR POINT? form.
Is the next child a segment or a point? (S/P)
Choose whether the next child is a segment or a point.
Complete the NEXT CHILD SEGMENT OR POINT? form and choose Apply to display the prompt:
Select the next child
Position the pointer and select the next child.
This process of repeatedly choosing break point pairs and children continues until all the children have been accounted for. Remember if you chose n children you will only need to select n-1 pairs of break points.
Processing
The processing is as described via the diagrams earlier in this section.
Messages
The following message appears when the calculations are commencing
Calculations are commencing - Please wait
Result
The result of this function is a set of triangles stored in the user specified trisolation and object number. The screen picture is updated automatically. The newly created trisolation is not saved to a file automatically, to do so you must use the Save File function.
Errors
Several checks are made concerning the validity of the selected points, segments and break points:
The points chosen must be on the same segment
Inconsistent parent segments chosen for splitting
Invalid segment
Invalid break of parent segment
Invalid choice of segments
Duplicate points on the first child segment
Duplicate points on the second child segment
Duplicate points on the next child segment
Duplicate points on the parent segment