Colour model by attribute
You can use this function to colour a block model by grade so you can clearly distinguish the areas of high grade and low grade. You can also colour the block model by a different attribute.
To run this function: Choose Block model > Display > Colour model by attribute, or...
For real attributes, the value ranges for colouring are defined using a standard range expression which is interpreted as successive pairs of from and to values. For each class in the defined range you must define a colour name to draw the block faces.
The maximum number of colours that can be used is 199, inclusive of the undefined face colour.
For integer and character attributes, you must define a colour to draw each Attribute value. The form has a table to define these Colour - Attribute values pairs as one record per row
A scan button has been provided to allow you to populate the colouring values easily. For Integer and Character attributes, all unique values found in the model will be given their own colour, as a single row in the colour table. For Real and Float attributes, a range will be constructed to include all values in the model. This range may include a single category at each end to account for outlying small or large values. The range will be constructed to provide about 10 different colours through the range of values.
The colours are populated from the Load styles field. The Reload button needs to be pressed every time the styles file is changed.
Block colours form
Load styles
Enter the name of the styles file that is to be used to load the colour/attribute values for colouring the block model. Note that the styles file may be unique to a particular block model and model attribute.
Reload
When a new styles file is selected, pressing this button will load the default block colours and the colour/attribute value pairs from the styles file into the colour table.
Default Face
Define the colour to be used for blocks whose attribute value is not defined by the class range defined below.
Default Edge
Define the colour to be used for drawing the edges for the block faces.
Attribute to colour by
Enter the name of the block model attribute field from which the values are to be obtained for colouring the model faces.
Scan
Pressing the scan button populates the colour/attribute value pairs into the colour table. For Integer and Character attributes, all unique values found in the model will be given their own colour, as a single row in the colour table. For Real and Float attributes, a range will be constructed to include all values in the model. This range may include a single category at each end to account for outlying small or large values. The range will be constructed to provide about 10 different colours through the range of values.
Ranges for colour selection
This field is selectable only if an attribute of type "real" has been selected to colour by.
Enter a range specifier to define the classes into which the attribute values are to be placed for the colouring of the attribute faces.
For real attribute ranges, the range is interpreted as successive pairs of from and to values as described below, e.g.
Range = 0,10,2;999
| From >= | To < |
| 0 | 2 |
| 2 | 4 |
| 4 | 6 |
| 6 | 8 |
| 8 | 10 |
| 10 | 999 |
This example defines 6 distinct classes and so 6 colour names are required. The first 6 colour names from the scrolling region are used for the corresponding colour class.
Apply transition when scanning
Tick this option to automatically transition the list of colours, from the colours selected in the First colour and Last colour fields. Note if there is a styles file loaded it, will take precedence over this option - to override the styles file press the Refresh button.
Refresh
A Refresh button has been provided to allow you to transition the colouring values easily. Click this button to transition the list of colours, from the colour selected in the First colour and Last colour fields.
First colour
When colour transitioning is used, the colour selected here will be used as the first colour in the transition range, and will populate the first row of the colour table. Subsequent rows in the colour table will gradually transition from this first colour to the last colour.
Last colour
When colour transitioning is used, the colour selected here will be used as the last colour in the transition range, and will populate the last row of the colour table. Preceding rows in the colour table will gradually transition from this last colour back to the first colour.
Legend
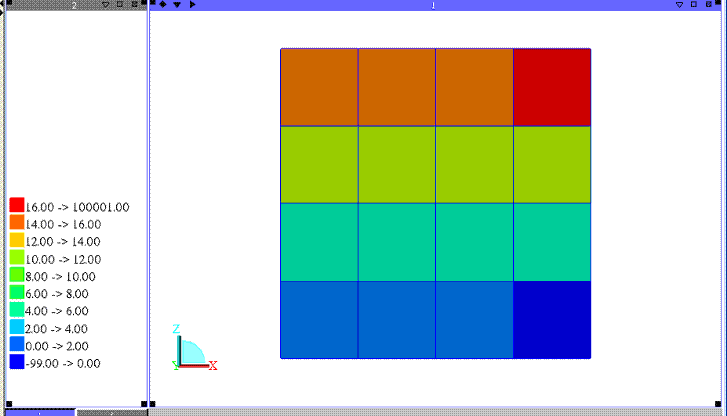
It is often useful to create have a legend in the Navigator to explain what the colours for each of the blocks mean.
Number of decimal places
The labels that are presented on the legend for the low and high bounds of each range can be formatted with a specified number of decimal places by entering the number of decimal places required here. This field is active only for the real attributes
Colour
The colour names for the various classes are defined in the colour table. The colours can be populated from a styles file, pressing the scan button, or the refresh button, otherwise you can manually define the colours for each attribute value in the colour table.
Attribute values
The legend values are defined in this column of the colour table.
The attribute values can be populated from a styles file, pressing the scan button, or;
- for real and float attributes by inputting a range
- for integer and character attributes by manually by entering different values in the rows.
Apply transparency
The block model transparency can be set explicitly from no transparency to fully transparent using the transparency slider. This setting will override the global transparency defined for the view. A block model transparency of 0% will prevent any transparency even if the global transparency is altered.
Save styles
Tick this option to save the current styles in a file. Enter the name for the styles file. The styles will be saved in that styles file when the form is applied
The example below shows a block model coloured by attribute with a legend beside it.