


Apply boundary string
To be able to include or exclude those strings that lie inside a boundary, is a very useful facility. The Apply Boundary function is analogous to a pastry cutter. This function allows you to apply a boundary that consists of one or more closed segments of one string, to a range of string or '.obs' files. You create new string files that contain only the string segments or points inside or outside that boundary.
To run this function: Choose File tools > Apply boundary string, or...
Define the boundary string
Location, ID number, String number
Identify the string file, and the string within that file which is to be used as the boundary. It must be a closed string, and may consist of more than one segment. The Z values in the boundary string are not relevant.
Define the existing string files
Location, ID number and (S)tring or (O)bs files
Identify the range of string or '.obs' files to which the boundary string is to be applied by entering the Location, IDrange and file type.
Any spot height strings
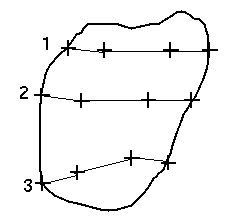
The question about whether or not there are spot height strings in the file is very significant. Points in a spot height string are simply tested to see whether they are inside or outside any segment of the boundary string and hence whether they will be written to the new file. Strings which are not spot heights however have line segments connecting consecutive points in the string, and if any of those segments cross the boundary string, a new point is written to the output file. This point is at the intersection point and has a Z value which is interpolated between the points either side of the boundary. The `Z' values of the boundary string have no relevance to the Apply Boundary function.
For example the following image shows three spot height strings with some points inside a boundary string.
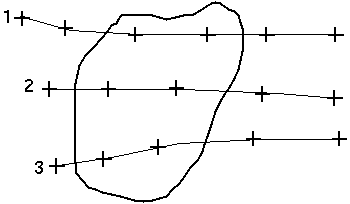
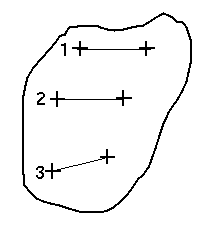
If strings 1 to 3 in the above example are nominated as spot heights, the resultant strings will look like:
If they are not nominated as spot heights, the resultant strings will look like:
Range
If some strings are to be used as spot height strings then the range of spot height strings must be entered here.
Define the files to be created
Specify the range of files that are to contain the required inside or outside data. The Location and ID range must be entered.
Note:The number of values in the output range ID range must match the number of values in the input range.
Retain string numbers
Enter `Y' or `N' to determine how string numbers are assigned for the resultant data.
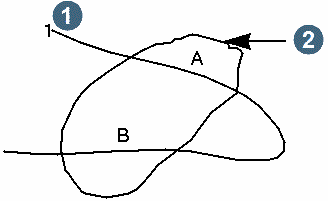
Consider the following example
|
1. data string 2. boundary string |
If you choose to extract data within the boundary in this case, and data string 1 is not a spot height string, then the required output will be the internal line segments labelled A and B. If you choose to retain the string numbers then both segments will still be identified as string 1. If you respond with `N' to indicate that string numbers are not to be retained, then each segment is written out with a new string number. In this example, segment A will be string 1 and segment B will be string 2. This sequential renumbering is automatic thus, there may be no correlation between input and output string numbers.
Retain descriptions
If the input files have point description fields you may choose to carry them through to the output file, or not.
(I)nside or (O)utside the boundary
Finally, nominate whether you want data Inside or Outside the boundary string.
Note:The concept of inside and outside will be reversed if the boundary string is anticlockwise.
Result
A series of new files are produced that contain strings which include intersections with the boundary.
The Z value at each intersection will be an interpolation along the original string.
Spot height strings are treated as unrelated points which are either inside or outside the boundary.
If the input files consist wholly of spot height strings, the output string files will contain points with the same string numbers. Otherwise, each segment in the output string file will have a unique string number assigned to it.
Special Considerations
The rounding of coordinates to three decimal places when saving points to string files can sometimes cause problems with regard to the locations of points relative to the string.
This sometimes results in points being located marginally (<0.002) on the wrong side of the boundary string. If this data is subsequently merged with the original boundary string, and used in the Create DTM function, spurious break line intersections may result.
To overcome this, the boundary string is modified (transparently and temporarily for the duration of the Apply Boundary function only) by expanding or contracting each closed segment of the boundary string by an offset distance of 0.01. This ensures that spurious intersections will never occur.
The result of this adjustment is that strings which have been clipped to a boundary will never come closer than 0.01 to the boundary string.
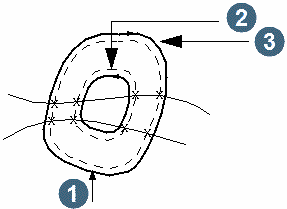
|
1. offset = 0.01 2. original anti-clockwise boundary segment 3. original clockwise boundary segment x = location of new points at intersection with adjusted boundary -- = temporary adjustment of boundary segments |
| Extraction Type | Boundary String Direction | Modification |
|---|---|---|
| Inside | Clockwise | Contracted |
| Inside | Anti-clockwise | Expanded |
| Outside | Clockwise | Contracted |
| Outside | Anti-clockwise | Expanded |
Messages
The shapes being intersected overlay each other ambiguously
Sometimes ambiguous situations arise which are difficult to resolve.
This problem of ambiguity may be resolved by altering the boundary string in one of two ways:
- Expanding or contracting by a small amount, or
- Shifting it in the X and/or Y direction by a small amount.
Generally 0.05 is sufficient.