


Internationalisation guide
The core technologies of GEOVIA support a flexible internationalisation system known as the Multi Lingual Translator (MLT). The MLT supports translations from a known text key value to the currently set language in the software. The text key is normally the plain English text for a message, a screen prompt, or a form label but can also be a text key value like RINGKING_TIP1 which will map to a large amount of text when translated.
There are a number of topics to be addressed when writing applications that wish to make use of the MLT. These are
- External Developer Prefix
- Language Databases
- Language Resource Files
- Accessing the MLT from the Server with SclMessage
- Accessing the MLT from the Client with Guido
- Backwards Compatibility with Pre Version 5.1
Note that full access to the MLT is only available to External Developers from Surpac V5.1.
External Developer Prefix
For an External Developer to begin making use of the MLT an external developer prefix code is required. This should be allocated by GEOVIA to ensure that there is no conflict between developers.
The developer prefix code ensures that language keys that you create do not conflict with internal MLT keys or other developers keys. A prefix is simply a unique identification code that is used to prefix the language keys that you will create in the Translation Manager and access in your Scl scripts.
An example of a developer prefix may be MS:: for Mine Solutions applications. All language keys created by Mine Solutions are then prefixed with this key, ie
"MS::Select the string to process”.
Note that the double colon "::” is part of the prefix and is required syntax in the MLT system.
Language Databases
Before you can start coding your applications to make use of message keys you must first create the required message keys. Management of message keys is controlled by an application called the Translation Manager which is available in the standard software installation. To gain access to the Translation Manager create a new desktop icon with the following target specification
c:\Program files\GEOVIA\Surpac\66\nt_i386\jre\bin\java.exe -classpath c:\Program files\GEOVIA\Surpac\66\share\java\ssiclient.jar com.surpac.mlt.TranslationEditor -x
Note that you must ensure that the path matches the version of the software that you have installed onto your computer.
The first time you use the Translation Manager you will need to specify your unique developer prefix and also create an initial translation master database. You only need to do this once as all your message keys should reside in the one master database even if you have multiple products. Creating more than one master database means you will end up creating a large number of message keys with duplicate text.
The translation master database file is called TranslationMaster.uni. It is in UTF-8 format and should never be edited with another program other than the Translation Manager as this will possibly lead to corruption and loss of language elements. When you begin to create message keys you will also need a work translation database, called TranslationWork.uni. This file is created automatically for you by the Translation Manager when you start entering keys.
All work you do including adding, editing, and deleting message keys and language text takes place in the work database. It is not until your perform a merge function that the edited data in the work database is carried across into the master database. Once a merge has been performed the changes are permanent and the only way to make further modifications is to edit a work database and perform another merge. This process is designed to support creation and editing of MLT keys and corresponding text, and translation of text to foreign languages by multiple developers. The process is identical to that used by GEOVIA's R&D staff.
The Translation Manager performs a variety of tasks with each of these tasks being broken into separate visual panels in the interface. This is a brief of the functions
- The Path Panel
- Specification of developer prefix
- Specification of the master database location
- Specification of the work database location
- Specification of any translation file
- The Create/Merge Language Translations Panel
- Handles creation of a translation file to be sent to a language translator
- Merges a work database into the master database
- Merges a translation file into the master database
- Creates the language resource files that are loaded by Surpac
- The Edit Working File Panel
- Adds new message keys with default English text
- Edits existing language keys from the master into the work database
- Deletes message keys from the master database (after merging)
- Removes a message keys from the work database
- The Edit Translation File
- Adds translated text in a foreign language for the message keys
- The Load from Tcl Files
- A utility to inspect Guido Tcl files for message text and automatically include them into the current work database. It also updates the Tcl files with the key names.
The Paths Panel
On starting up the Translation Manager the first panel that is shown is the paths panel. On this panel you setup your developer prefix and also the pathnames to your translation databases. Note that until you enter your developer prefix you will not be able perform any other action in the Translation manager.
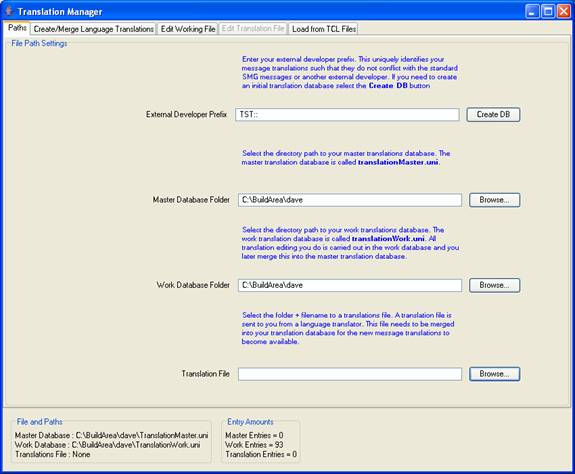
All entries are saved into a defaults file that resides under your user area of in C:\Documents and Settings.
The Create/Merge Languages Panel
Most of the Translation Managers functions to create and merge files can be found on this panel.
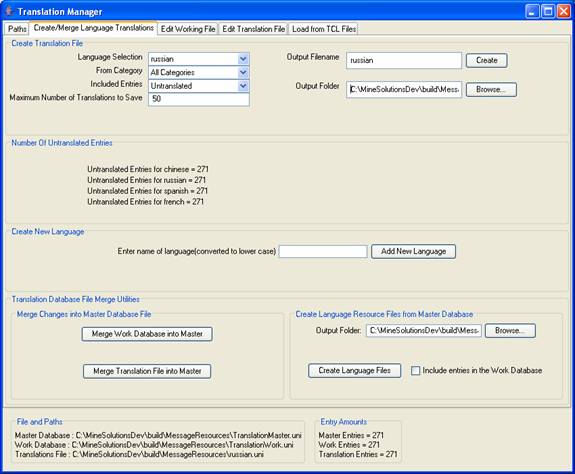
Create Translation File
When you have completed your message keys for a particular project and have merged them into your master database you will want them to be translated into other languages such as Chinese or Russian. This process is know as creating a translation file and is performed by selecting
- the language,
- the category of messages (discussed later)
- whether you want translated or untranslated messages
- the maximum number of messages to output to the translation file
- the name of the translation file (defaults to the language selection)
- the folder in which to create the translation file
Once selected you press the Create button to create a file in the specified directory with the specified name with an extension of .uni. As an example if you elected to create a translation file called russian then the system would generate a file called russian.uni
The translation file is then sent to a person who will perform the actual language translation on your messages. After their work is complete they return the translation file and you use the Merge Translation File into Master function to insert the translated text into your master database.
Merge Changes into Master Database
This section consists of two functions. The first button called Merge Work Database into Master will apply all the edits you have made to the currently selected work database into the master database. Once done, you can generally discard the work database as all additions, edits, and deletions specified in it will have been applied.
The second button to Merge Translation File into Master provides the function to apply actual language translations in the currently selected translation file (on the Paths Panel) and place them into the master database.
Create Language Resource Files from Master Database
In order to make use of your message keys and language translations in your extension applications, you need to create the resource files that Surpac and related products load. To do this select an output directory and press the Create Language Files button.
The created resource files are the ones that you will distribute with your application. The files have a particular naming convention and you may not change them. The resource files take on the name of each supported language with your developer prefix as its file extension. For example if the developer prefix was MS then a series of files called:
- default.MS
- chinese.MS
- french.MS
- russian.MS
- spanish.MS
would be created. Note that the file containing the English text is called default and not english, default.MS from the example above. These files must be placed into the SSI_MSG: directory of Surpac to be loaded by the software so that your messages will be available.
The Edit Work File Panel
This panel is where you will perform the majority of your work in the Translation Manager. It is in here that you create and edit your message keys and text.
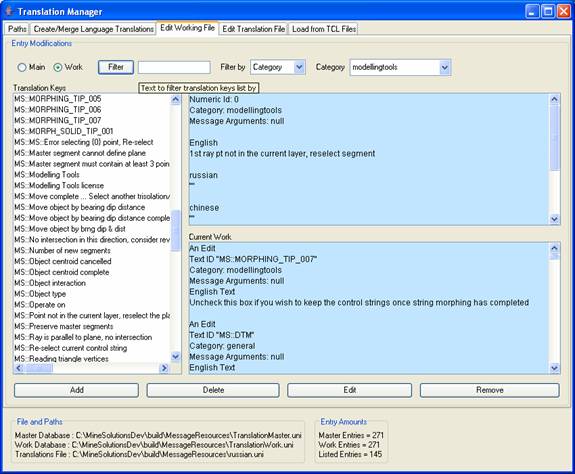
The left hand side of the panel contains a list of the message keys. This list can be switched between the main (master) database and the work database. There are also options at the top of the panel to filter the displayed keys that will enable you to find a key of interest more easily. The filtering options are:
- EntryID - This will search the actual message keys for the given keyword. This filter uses a case-insensitive, keyword search. Once you select this option, you will need to enter the keyword to search for and then press the Filter button
- Language Text - In the filter by input is listed all the current languages. Selecting one of these will search the text in the selected language of all messages for the given keyword. This filter uses a case-insensitive, keyword search. Once you select this option, you will need to enter the keyword to search for and then press the Filter button
- Category - All messages in the system have a category associated with them. By default the category is external but you are encouraged to create your own categories when adding messages. The category is simply to help you organise your messages into groups so that you can better locate them when required. To filter the message keys on category select this option, and then select the category from the drop-down list that will appear. Press the Filter button to apply the category filter.
Add a new message
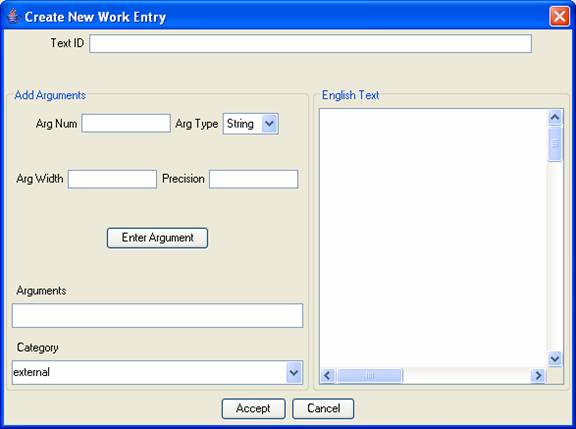
To add a message into the work database select the Add button located on the bottom of the panel. The following window will now be displayed:
2.3.1.1 Message Keys and Text
In the Text ID input field enter either the English text for your message or a key value if the message is large, say over 100 characters.
As an example the message text may be something like "Enter the string number”
or, if you had a large amount of text that may be used as a tip on a form you might enter
DECLINE_TIP_001
In the section titled English Text enter the actual text of the message. If the key text is identical to the message text then you can leave this area blank as the text will be automatically assigned when you apply the form.
2.3.1.2 Message arguments
In the text of your message you can insert argument placeholders that will be substituted with variable arguments at application runtime. Variable arguments are used in output messages where the exact value of the message is not known or is different all the time, for example when outputting the result of a calculation or printing an error about a file not being present.
The place holder syntax is quite simple and can be inserted directly into the text or you can use the add arguments facilities on the form to help you. As an example if you wanted to display a message such as
Error opening <filename> for input
Where <filename> is a variable that can change, then you would enter your message text as
Error opening {0} for input
The {0} signifies a variable that will be substituted later for a value. If you require more than one argument then you insert more placeholders that will increment in value, ie {1}, {2}, {3} … {n}.
The same argument placeholder can be used more than once in the message if required. For example
Error opening {0} : Cannot locate file {0} in the current directory
(it would probably be a godo idea to explain how the arg type, width and precision are used)
2.3.1.3 Message Category
All new messages must also be assigned a category. By default the category is external but if you want to assign messages to you own custom categories enter the name or select a pre-existing category from the list. Message categories are mechanism employed by the Translation Manager to organise and filter groups of messages.
2.3.2 Edit an existing message
To edit a message select the message key you wish to edit from the message key list, and press edit button or double click it with the mouse. To edit a message key that is in the master database simply selected it and press Edit as you would for a work key. When you save your edits the modified key will be placed into the work database. Note that the master database will be unchanged; the only way to modify the master database is to merge your work file with it.
The actual editing process is exactly the same as adding a new message but beware of the following:
- It is not possible to change the message key of the message. To do this you must delete the message and recreate it with the appropriate key. See the notes in deleting message keys before you do this
- If the message key is the same as the English text do not change the English text but rather add a new message instead. Editing the text of a message can be dangerous as the message may be used in other parts of your application. This is a dangerous thing to do and should be avoided in favour of adding new messages.
- Editing a message will remove all of the translations for that message, and so the message will have to be re-translated. This is because by changing the English text/grammar you have no doubt changed the wording and grammar in other languages.
2.3.3 Delete an existing message
Select the message you wish to delete from the message key list, and then press the Delete button. You will be prompted to confirm that you wish to delete the message, and once you accept the confirmation form, the message deletion will be included in your work file. The deletion only becomes permanent once the work file is merged into the master file.
You should be extremely careful when deleting messages to ensure you are aware of each instance in your application that the message is used. Search your source code for other instances of the message prior to deleting it.
If you delete messages from the MLT database but leave the MLT key in forms or messages the software will no longer be able to display the correct text for the deleted MLT key.
2.3.4 Remove a work operation
The Remove button allows you to remove an edit operation from the work file. This operation may be an addition, a deletion, or an edit. The remove function will only affect work keys listed in the message keys section. Select the message you wish to remove from the message key list, and then press the Remove button. You will be prompted to confirm that you wish to remove the operation and once you accept the confirmation form, the message will be removed from your work file.
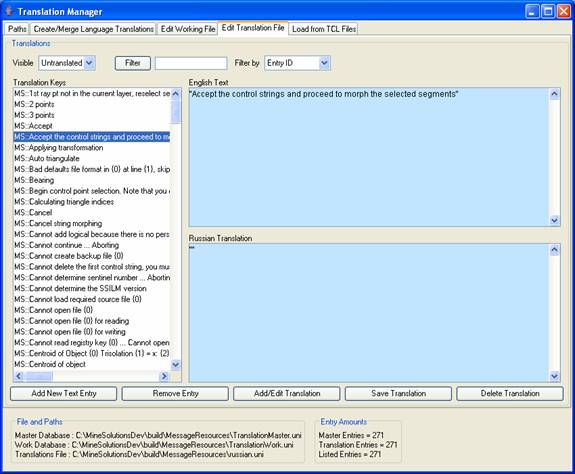
2.4 The Edit Translation File Panel
The edit translation file panel is used to insert actual language translations. This is the panel that a language translator uses but if you are a bi-lingual developer you may enter the translations through this panel.
2.4.1 Filtering Operations
It is often useful to cut down the size of the list when looking for or adding a new message. The filtering functions allow you to do this. There are a number of filtering functions:
- All Entries - This displays all messages in the current translation file.
- Untranslated Entries - These are entries you have not entered a translation for. Once this filter displays an empty list, the translation of all entries in the current translation file is complete.
- Translated Entries - These are the messages that you have currently entered a translation for.
2.4.2 Translations
To add a language translation to the file:
- Select the message to translate from the list of message keys on the left. This list may be filtered as described above to cut down on the number of entries.
- Press the Add/Edit Translation button to enable you enter or edit the foreign message text in the lower right panel. The top right panel will display the English text.
- The first time you translate a message, the lower right panel will be filled with the English text. The reason for this is that messages may contain
argument placeholders which must be maintained in the foreign language translation. It is very important that the variable arguments stay the
same in all languages, so to make that easier; the Translation Manager copies the English text in here to maintain the argument structure. If
the number of arguments in the translated language does not equal the number in the English text, then the translation cannot be saved.
It is permitted to change the order of the message arguments. The grammar of different languages may require the order of the arguments to be quite different. - Once the translation of the message is complete, press the Save Translation button.
- If you need to modify the translation of a message at a later date, simply repeat the above steps. The old changes will be displayed, and you just need to edit them, and then press the Save Translation button again.
2.5 The Load From Tcl Files Panel
The load from Tcl files panel is a utility function that allows Gudio Tcl files to be scanned and all message text extracted from them ready for insertion into your work database.
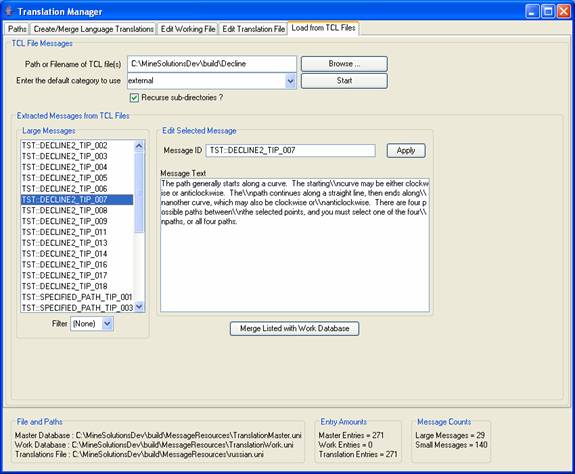
To load text from Guido Tcl files select the file(s) or an entire directory containing the Guido Tcl files to load. The function can also be made to search recursively through all directories underneath the selected directory (by selecting or unselecting the Recuse Sub-directories check box). You may also select a category to place the retrieved message into.
This utility only scans Guido form definitions looking for particular switches that it can extract message text from. The switches that a searched are:
- -caption
- -label
- -tip
- -value_in
All text found with these switches will be used as the message key except in the case of very long messages such as tips on forms. Message keys are limited 200 characters in length so for message text longer than 200 characters a short message key is created with the entire text stored as the message text. These items are listed in the key list after your press the Start button.
At this stage none of the extracted messaged have been added to the work database. If you are happy with the message keys, select the Merge with Work Database button. This will not only insert the new keys into the work database but also update the appropriate Tcl files and insert any new keys that will include your developer prefix. You should check the Tcl at the completion to ensure that correct structure has been maintained.
Language Resource Files
The process of maintaining a database of message keys, English text, and foreign language text in a uni code database is described in section 2. One of the outputs created by the Translation Manager is language resource files. The language resource files are required by Surpac and related products in order to know about your message keys and associated language text. If your resource files are not loaded by the software it will have no way of knowing about your messages.
The naming convention for these resource files is to take the name of the language as the file's base name and then use your developer prefix as it file extension. Note that the resource file for English text is called default and not English. The following are example names as created for Mine Solutions applications whose developer prefix is MS
- default.MS
- chinese.MS
- french.MS
- russian.MS
- spanish.MS
Creating Language Resource Files
The resource files can be created by you manually in the Translation Manager application as described in section 2.2.3 above or this process can be automated in your build procedures using another application called the Translation Builder. The translation builder is run from the command line with the following syntax
<java.exe> -classpath <ssiclient.jar> <-wb> <-x prefix> <master db> <work db> <output dir>
Where
<java.exe> is the full pathname to the java VM
(i.e. C:\Program Files\GEOVIA\Surpac\66\nt_i386\jre\bin\java.exe_)
<ssiclient.jar> is the full pathname to the SSI client
(i.e. C:\Program Files\GEOVIA\Surpac\66\share\java\ssiclient.jar)
<-wb> is an optional switch to include your current work database entries. If you specify
this switch then you must also specify a work database
<-x prefix> is the full specification of your developer prefix
(i.e. -x MS::)
<master db> is the full pathname to the master database
(i.e. translationMaster.uni)
<work db> is the full pathname to the work database. Only specified with the -wb switch!
(i.e. translationWork.uni)
<output dir> is the pathname to the directory to create the resource files in
(i.e. MineSolutionsDev\Build\Resource)
An example to build only from the master database using the Mine Solutions prefix
C:\Program Files\GEOVIA\Surpac\66\NT_i386\jre\bin\j java.exe -classpath C:\Program Files\GEOVIA\Surpac\66\share\java\ssiclient.jar com.surpac.mlt.TranslationBuilder -x MS: language\translationMaster.uni resource
NB: The above is entered on a single line and is not two separate lines as shown
An example to build from the master database and include the latest edits from a work database
C:\Program Files\GEOVIA\Surpac\66\NT_i386\jre\bin\j java.exe -classpath C:\Program Files\GEOVIA\Surpac\66\share\java\ssiclient.jar com.surpac.mlt.TranslationBuilder -wb -x MS: language\translationMaster.uni language\translationWork.uni resource
NB: The above is entered on a single line and is not two separate lines as shown
Using Language Resource Files
In order to access your message keys and translations the resource files that you create (section 3.1) must be loaded by Surpac. This involves copying the resource files into the message directory under the main software installation directory tree. This is usually
C:\Program Files\GEOVIA\Surpac\66\share\msg
and has a logical reference of
SSI_MSG:
Note that the version specified above as V5.1-A will change for each version of Surpac.
Once your resource files have been copied into the msg directory your messages will then be available the next time Surpac (or related products) starts.
You application installation / setup procedure should perform this action and not rely on users to do this. The correct directory can be determined from looking up the translation file (translate.ssi) and inspecting the setting of the SSI_MSG: logical.
Accessing the MLT from the Server with SclMessage
From version 5.1 of Surpac and related products a Scl command called SclMessage is available that allows you to access your message keys to retrieve the translated text. The syntax for the SclMessage command is
SclMessage <sub option> <message key> <optional parameters>
Where the sub option can be
- print - Print the message key text into the message window. If optional arguments are given they will
be formated into the message text as described below.
SclMessage print "MS::Macro has complete succesfully"
- message - Same as print
SclMessage message "Another way to print a message"
- debug - Print the message key text as a debug message. If debug messages are currently disabled via the Message Options settings then it will be filtered out and nothing
will be visible in the message window
SclMessage debug " MS::Reached point A in the macro, were is my bug"
- warning - Print the message key text as a warning message. If warning messages are currently disabled via the
Message Options settings then it will be filtered out and nothing will be visible in the message window
SclMessage warning " MS::Macro cancelled"
- error - Print the message key text as an error message. If the Beep for error messages option is set
via the Message Options settings then the computers bell will also ring.
SclMessage error " MS::Macro has complete succesfully"
- assist - The assist sub option will display the message text as an assist message in the status bar usually with a light yellow background. The assist message will remain until another assist message is displayed or until the noAssist sub option is called SclMessage assist " MS::Select the object to process"
- noAssist - The noAssist option will clear any assist message that is currently displayed. The
{} placer holder argument must be specified as the message key for noAssist.
SclMessage noAssist {}
- translate - The translate option will format the message key and any of the optional arguments that may be specified
and return the formatted text. This option does not display the message to the message window.
set formattedMsg [SclMessage translate "MS::File {0} not found in {1}" "pit1.str" "srv"]
If you have included variable arguments in your message by using the placeholder tokens ({0}, {1}, etc) then you must pass values to these arguments when you call the SclMessage command. If you do not pass enough arguments to the SclMessage command the placeholder token will not be substituted and will therefore appear in the translated message.
Note also in the examples given above that your developer prefix must be specified at the start of the message key. This allows the MLT to lookup the correct message so that it doesn’t confuse your message with a GEOVIA MLT key or that of another developer. If the message cannot be located in the language resource files the untranslated message key is returned which will include the developer prefix.
Accessing the MLT from the Client with Guido
The Guido client has always been able to translate message keys into other languages but it was not until version 5.1 of Surpac and related products that the ability to load custom language resource files was implemented. To access your custom message keys you use Guido in the normal way and simply code your message keys with your developer prefix. The examples below using the MS:: developer prefix best illustrate this.
Example 1 - A form using external developer keys
set mainForm {
GuidoForm morphingForm {
-label "MS::Triangulate Morphed Strings"
-default_buttons
-tip "MS::MORPHING_TIP_001"
-help_url MS_MODELLINGTOOLS_HELP:mtools_form1.html
GuidoField newsegs {
-label "MS::Number of new segments"
-format integer_4
-display_length 5
-tip "MS::MORPHING_TIP_002"
}
GuidoField newstrno {
-label "MS::New string number"
-format integer_4
-translate none
-display_length 5
-low_bound 1
-tip "MS::MORPHING_TIP_003"
}
GuidoCheckBox preserve {
-label "MS::Preserve master segments"
-selected_value "y"
-unselected_value "n"
-default "n"
-tip "MS::MORPHING_TIP_004"
}
GuidoCheckBox clean {
-label "MS::Remove duplicates"
-selected_value "y"
-unselected_value "n"
-default "y"
-tip "MS::MORPHING_TIP_005"
}
GuidoField trapdist {
-dependency {"[$clean getCurrentValue]" == "y"}
-label "MS::Trap distance for removing duplicates"
-format real_8
-translate none
-display_length 5
-low_bound 0
-tip "MS::MORPHING_TIP_006"
}
GuidoCheckBox delcontrols {
-label "MS::Remove control strings"
-selected_value "y"
-unselected_value "n"
-default "y"
-tip "MS::MORPHING_TIP_007"
}
}
}
Example 2 - A menu using external developer keys
set Modelling_items {
GuidoMenuItem Modelling_item0 {
-label "MS::String morphing"
-icon minesolutions/icons/ms_morphing.gif
-command server MS_MODELLINGTOOLS:morphing.tbc
}
GuidoMenuItem Modelling_item1 {
-label "MS::Triangulate morphed strings"
-icon minesolutions/icons/ms_morphingtriangulate.gif
-command server MS_MODELLINGTOOLS:morph_solid.tbc
}
GuidoSeparator separatorModelling1 {}
GuidoMenuItem Modelling_item2 {
-label "MS::Extend line to plane"
-icon minesolutions/icons/ms_extline2plane.gif
-command server MS_MODELLINGTOOLS:int_ray_plane.tbc
}
GuidoMenuItem Modelling_item3 {
-label "MS::Extend line to object/DTM"
-icon minesolutions/icons/ms_extline2obj.gif
-command server MS_MODELLINGTOOLS:int_ray_object.tbc
}
GuidoSeparator separatorModelling2 {}
GuidoMenuItem Modelling_item4 {
-label "MS::Triangulate single segment"
-icon minesolutions/icons/ms_triangulate1seg.gif
-command server MS_MODELLINGTOOLS:seg_solid_2way.tbc
}
GuidoMenuItem Modelling_item5 {
-label "MS::Triangulate seg by brng dip & dist"
-icon minesolutions/icons/ms_triangulatebdd.gif
-command server MS_MODELLINGTOOLS:seg_solid_1way.tbc
}
GuidoSeparator separatorModelling3 {}
GuidoMenuItem Modelling_item6 {
-label "MS::Move object by brng dip & dist"
-icon minesolutions/icons/ms_moveobjbybdd.gif
-command server " MS_MODELLINGTOOLS:obj_move_bdd.tbc
}
GuidoMenuItem Modelling_item7 {
-label "MS::Centroid of object"
-icon minesolutions/icons/ms_objectcentroid.gif
-command server MS_MODELLINGTOOLS:object_centroid.tbc
}
GuidoMenuItem Modelling_item8 {
-label "MS::Clean trisolation"
-icon minesolutions/icons/ms_cleantrisolation.gif
-command server MS_MODELLINGTOOLS:clean_trisolation.tbc
}
GuidoSeparator separatorModelling4 {}
if {[$Modelling_item0 isInputAllowed]} {
GuidoScript minesolutions/scripts/menus/ModellingTools_demo_menu.tcl
GuidoScript minesolutions/scripts/menus/ModellingTools_license_menu.tcl
GuidoMenuItem Modelling_itemB {
-label "MS::Help"
-command script "forms/help.tcl" MS_MODELLINGTOOLS_HELP:index.html
}
}
}
GuidoMenu Modelling_menu {
-label "MS::Modelling Tools"
-icon minesolutions/icons/ms_modellingtools.gif
-delayed_script $Modelling_items
}
The GuidoMessage Command
The GuidoMessage command is available in the Guido interpreter and works in exactly the same fashion as the SclMessage command described in section 4. The syntax is
SclMessage <sub option> <message key> <optional parameters>
Where
- print - Print the message key text into the message window. If optional arguments are given they will
be formated into the message text as described below.
GuidoMessage print "MS::Macro has complete succesfully"
- message - Same as print
GuidoMessagemessage "Another way to print a message"
- debug - Print the message key text as a debug message. If debug messages are currently disabled via the Message Options settings then it will be filtered out and nothing will be visible in the message window GuidoMessage debug " MS::Reached point A in the macro, were is my bug"
- warning -Print the message key text as a warning message. If warning messages are currently disabled via the
Message Options settings then it will be filtered out and nothing will be visible in the message window
GuidoMessage warning " MS::Macro cancelled";
- error - Print the message key text as an error message. If the Beep for error messages option is set
via the Message Options settings then the computers bell will also ring.
GuidoMessage error " MS::Macro has complete succesfully"
- translate - The translate option will format the message key and any of the optional arguments that may be specified
and return the formatted text. This option does not display the message to the message window.
set formattedMsg [GuidoMessage translate "MS::File {0} not found in {1}" "pit1.str" "srv"]
Backwards Compatibility with Pre Version 5.1
If you are developing your application to work with Surpac V5.1 and better, you do not have to worry about backwards compatibility with the use of message keys. If however you want your applications to work in V5.0 and V4.1 then you will have to consider issues with regard to message translations and the fact that the SclMessage command is not implemented in these earlier versions of the software.
There is no way to make your applications multi lingual in these earlier versions, but you will be able to use the same code to implement English (the default language) with a few adjustments. Because most of your message keys will be the actual English text for your messages and labels all that is required is to strip your developer prefix from them and the English text will appear as you intended. This needs to be handled on both the server and the Guido client.
Handling SclMessage on the Server
Because the SclMessage command does not exist prior to V5.1 you cannot have your script execute the function otherwise an undefined command error will occur. It is suggested that you create a wrapper procedure to do your printing. The wrapper procedure can test for the existence of a Surpac Scl defined constant called SCL_LANGUAGE_TRANSLATIONS. If this constant exists then SclMessage can be called otherwise you will have to strip your prefix code and use the Tcl puts command to print the message.
The following procedure will deal with this situation and also handle variable argument substitution.
#
----------------------------------------------------------------------------
# Name
: message
#
# Description : Translate a message key and return it or display it according
#
: to the message function. For language enabled versions of
#
: Surpac the MLT sub system is called otherwise a simple format
#
: of the message is performed by a sequential replacement of
#
: arguments, ie argument positions are not maintained.
#
# Parameters : function - the message function which must be one of
#
:
translate/message/debug/warning/error/assist/noAssist#
: msgKey - the message key (usually english text)
#
: arguments - option arguments to be formatted into the translated
#
:
text. Place holders for arguments are {0}, {1}, {2}, etc
#
# Return values : None
#
# Author : David van de Ven - vComp pty Ltd
# Created : 28 July 2005
# ----------------------------------------------------------------------------
proc message {args} {
global SCL_LANGUAGE_TRANSLATIONS
# ------------------------------------
# make sure there are enough arguments
# ------------------------------------
set argc [llength $args]
if {$argc < 2} {
error "message: Invalid arguments; must be message function key [args ...]"
}
# ------------------------------------------------------------
# see if we are running in a language enabled verion of Surpac
# ------------------------------------------------------------
if {[info exists SCL_LANGUAGE_TRANSLATIONS]} {
# --------------------------------------------
# get Surpac to perform a language translation
# --------------------------------------------
lappend cmd SclMessage
lappend cmd translate
for {set i 1} {$i < $argc} {incr i} {
lappend cmd [lindex $args $i]
}
set text [eval $cmd]
} else {
# -------------------------------------------------------------------
# not a language enabled version of Scl so format the message ourself
# -------------------------------------------------------------------
set key [lindex $args 1]
set argNo 2
# ----------------------------------
# work out where the msg prefix ends
# ----------------------------------
set sNdx [string first "::" $key]
if {$sNdx < 0} {
set sNdx 0
} else {
set sNdx [expr $sNdx + 2]
}
# --------------------------------------------------------------------------
# loop over all characters and replace arg holders with the actual arguments
# --------------------------------------------------------------------------
set skip 0 internationalisation_guide
set len [string length $key]
for {set i $sNdx} {$i < $len} {incr i} {
set chr [string index $key $i]
if {!$skip && ("$chr" == "\{")} {
set skip 1
if {$argNo > $argc} {
error "message: Arguments do not match format"
}
append text [lindex $args $argNo]
incr argNo
} elseif {"$chr" == "\}"} {
set skip 0
} else {
if {!$skip} {
append text $chr
}
}
}
}
# -------------------------------------------------------
# now handle the message function with the translated key
# -------------------------------------------------------
set function [lindex $args 0]
if {"$function" == "translate"} {
return $text
} elseif {"$function" == "message" || "$function" == "print"} {
return [puts $text]
} elseif {"$function" == "warning"} {
return [puts "Warning: $text"]
} elseif {"$function" == "error"} {
return [puts "Error: $text"]
} elseif {"$function" == "debug"} {
return [puts "Debug: $text"]
} elseif {"$function" == "assist"} {
puts $text
} elseif {"$function" == "noAssist"} {
SclPause 0.001
}
return $ms::TRUE
}
Handling Translations in the GuidoScripts
The backwards compatibility issue is not as great in Guido as the system has handled translations from V4.0 onwards. The only issue to deal with is the removal of your developer prefix. The Guido interpreter in V5.0 has a Surpac constant value placed in it called GUIDO_LANGUAGE_TRANSLATIONS.
If you test for the existence of this variable you can determine if you need to strip your developer prefix or not. The following code sample shows how to achieve this in a simple manner by defining a prefix variable that will either contain the developer prefix or be set to blank.
set formDef {
# test if this version of Surpac supports translations
if {[info exists GUIDO_LANGUAGE_TRANSLATIONS]} {
set MS "MS::"
} else {
set MS ""
}
proc print {} {
global MS
GuidoMessage message "${MS}Some message that you may want to print"
}
GuidoForm form {
-label "${MS}The Form Heading"
-default_buttons
GuidoField field {
-label "${MS}A Field"
-width 20
-format none
-null false
}
GuidoComboBox combo {
-label "${MS}A Combobox"
-width 20
-format none
-value_in A B C D E F
-null false
}
GuidoButtonGroupPanel bg {
-label "${MS}A Button Group"
GuidoRadioButton b1 {
-caption "${MS}Button1"
}
GuidoRadioButton b2 {
-caption "${MS}Button2"
}
}
GuidoButton b {
-caption "${MS}Press Me"
-action valueChanged {[print]}
}
}
}