


Save as image file
This function saves the screen image to a file in either a GIF or PNG format. You may find this useful to include dumps of screen images in documents or to create large colour plots of images generated in the graphics window of interest.
To perform either of these tasks you must first dump the screen image to a file and then use some third party software which can manipulate GIF or PNG files for inclusion into documents or for printing to colour printers.
To run this function: Choose File > Images > Save an image, or...
- In the Function Chooser, type GIF DUMP, and press ENTER.
- In the Function Chooser, type GIF DUMP PLOT, and press ENTER.
- In the Function Chooser, type GIF DUMP SHEET SETUP, and press ENTER.
 Note: In a macro, you can also activate this functionality by running the following functions: GIF DUMP STABILITY, GIF DUMP STATISTICS, and GIF DUMP VARIOGRAM. Each of these functions run only when a specific window is active. These windows are the Stability Monitoring window, the Basic Statistics window, and the Variogram Modelling window respectively.
There are a number of different graphics windows used by the various application modules of the software. These include the 3D graphics window, plotting window, plotting sheet setup window, stability monitoring window, statistics window and a variogram window. For each window a special function exists to save the image file. This is to ensure the correct image for the window of interest is saved.
Define file type to create
Choose gif to create a file in GIF format or png to create a file in PNG format.
The principal difference between the two supported file formats is that GIF files only store images with 256 distinct colours whereas PNG files will store what is known as 24 bit or true colour. The differences between the two file types are subtle and will generally only be noticed when the image to be saved has a large number of colours. In this case the PNG file will more closely resemble the original image. The superior quality images come at a small cost in increased file size for the PNG files.
Filename
Enter the name of the .gif or .png file which is to be created. No file extension is required. The .gif or .png extension is automatically appended to the file name which is entered.
Area to save
There are two available options to determine what portion of the graphics window is exported to the GIF or PNG file. They are:
- workspace
The graphics workspace is saved. This includes all viewports. example: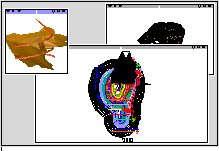
- viewport
Only the active viewport is saved. Note that all decoration that pertains to viewport manipulation such as the title block and resizing markers are not included. In this way only the data viewed will be saved and this will typically be the preferred option.
example:
X resolution, Y resolution
The physical resolution, that is the number of pixels in the X and Y directions, of the display device which you are using is displayed as defaults in these fields. Normally you would accept these defaults. You can change the resolution at which the image is saved to the file if necessary. Increasing the resolution however will increase the size of the file which is created. Note that the default resolution is changed depending on the area chosen to save.
Result
A file in GIF or PNG format which contains the screen image at the resolution requested is created.