


Charge holes
To run this function: Choose Design > Ring design > Charging > Charge holes, or...
If a design area has already been selected, you will be prompted for the names of the current drive and stope outlines with the CURRENT POSITION INFORMATION form.
Stope
The name of the current stope outline.
Drive
The name of the current drive outline.
If no drive has been selected, or the CURRENT POSITION INFORMATION form was applied, the Charge Holes function will display the prompt:
Select the hole to be charged
Select a hole to be charged. The parts of the selected hole which are outside the critical radius of existing charges are computed. The chargeable portion of the selected hole which is closest to the toe of the hole is then charged.
The selected hole has already been charged
The hole selected has already been charged. The charge interval may be too small to see, or the incorrect hole was selected.
Note on order of hole charging
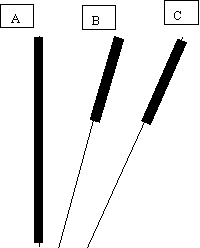
The algorithm which chooses which part of each hole is chargeable (this function uses the Critical radius method regardless of the Charging method specified on the Charging Parameters form) starts at the toe of the hole and proceeds down the hole until the critical radius condition is violated by one of the other holes that has already been charged. The portion of the hole between this point and the toe of the hole is then the chargeable portion. The order in which you select the holes to be charged can therefore have an effect on the chargeable part of each hole.
Say you have three holes to charge A, B and C:
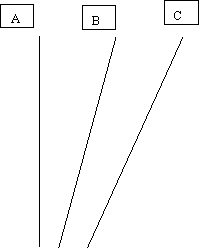
If you select the holes to charge in the order A, B, C your chargeable portions will look like this:
However if you select the holes to charge in the order A, C, B, your chargeable portions will look like this:
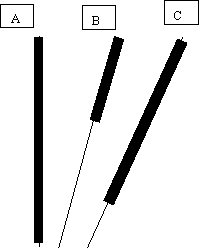
This is because hole C is furthest away from A, so if C is charged before B more of it can be filled before the critical radius condition is violated.