


Customised firing sequence
The function BLAST GENERATE CUSTOMISED FIRING SEQUENCE allows you to graphically create a customised firing pattern. The delay name and the delay interval are stored in the description fields 13 and 14 of every point representing the blast hole. After generating the firing sequence you must load the holes into a database by using the function "BLAST LOAD TO DATABASE". The delay name and delay intervals are stored in their respective fields in the collar table of the database. This will permit you to reproduce the firing sequence from the database whenever required. A string file is also created in a new layer containing a number of strings wherein each string contains all the blast holes that are going to be blasted simultaneously. This string file is for display purpose only
To run this function: Choose Design > Blast design > Firing sequence > Customised firing sequence, or...
Customised firing sequence form
Output layer name
Enter the name of the layer that is to be created. A string file showing different strings for different rows will be created in this layer. New strings will be appended to this layer for subsequent runs of this function unless a new layer name is entered or graphics is cleared.
Use blast holes from
Define how the blast holes for generating the firing pattern are to be selected. The valid choices are "String file", "Active layer" and "Database".
String file
If String file is selected, you will be prompted to enter name of an existing string file that contains a previously designed blast pattern. All the blast holes from the string file are then displayed in the graphics window. The next time this function is run, the options "String file" and "Database" are disabled and only the "Active layer" is enabled, as the firing sequence will be generated in the active layer.
Active layer
If you select "Active layer", then the firing pattern will be generated using the blast holes from the active layer.
Database
If you select Database, you will be prompted to select an existing blast pattern from the database. The blast holes in the selected pattern from the database will be extracted and displayed on the graphics viewport. The firing pattern will be generated using these blast holes. Note the database must be open first for this option to be selectable.
If this function is run again while blast holes are loaded into the active layer, the options "String file" and "Database" are disabled and only "Active layer" is enabled, as the firing sequence will be generated in this layer.
Name blast hole layer
Enter a name for the new layer. The blast holes from the string file / database will be loaded into this layer. This field is active only for the first time when you run the function.
Tie in line / row number
Enter the row number for the blast holes. All the selected blast holes will be tied in this row. A string corresponding to this row number will be created in the output layer. The row number is used to assign the string numbers for different strings representing different rows. Keeping the row number the same will assign the same string number to different rows.
Inter row delay
Select the delay from the combo box. The delay names that are displayed in the combo box are from the blast defaults.
Snap to firing line tolerance
This is the influence on either side of the base line dragged by the user. All holes whose perpendicular offset from the digitised firing base line is less than this tolerance are considered to be on the same firing row.
Cumulative surface delay settings
This section of the form allows you to view / edit the cumulative surface delay time.
Reset cumulative delay time
Tick this box to reset the current cumulative delay time to a new value.
Input new cumulative delay time
The cumulative delay time is set to the value entered in this field.
For example : If the current cumulative delay time for the previous row is 300ms you might choose to reset the current cumulative time to 0ms and assign a delay of 25ms to the current row. The cumulative delay time assigned to the current row will then be 25ms.
The current cumulative surface delay time is
This field displays the current cumulative delay time assigned to the previous row.
Blast hole selection method :
This section of the form defines how you select the blast holes.
Selecting Select every blast hole collar will prompt you to select each blast hole. When you have finished selecting the blast holes, press the Escape key.
All the selected blast holes will be tied together in one row and then will be assigned the corresponding delay.
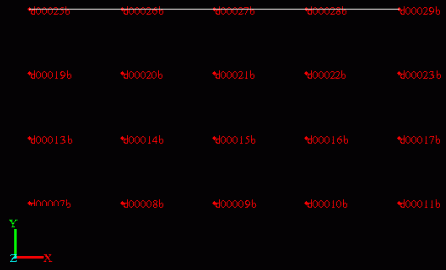
Snap to row ends :
| Start point | End point |
|
|
Selecting Snap to row ends will prompt you to digitise the starting point of the row and the end point of that row. All the blast holes that lie on this line within the limits of tolerance will be tied together and then will be assigned the corresponding delay.
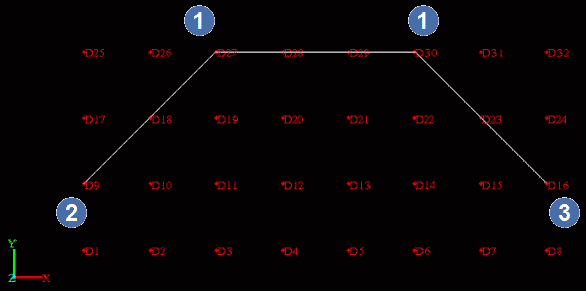
Snap to start, inflection and end points :
|
1. inflection point 2. start point 3. end point |
Selecting Snap to start, inflection and end points will prompt you to digitise the first point of the row, inflection points and the end point of that row. You can select the starting point, inflection points, select the end point and then press the Escape key after finishing the selection. All the blast holes that lie on the line joining the start point, inflection points and the end point will be tied together and then will be assigned the corresponding delay.
Complete the Customised firing pattern form to display the prompts:
The different prompts that are displayed are :-
Digitise a point to select the starting point of the row
Digitise a point to select the end point of the row
Select the blast holes
Tick the option Allow reselection for the blast holes from the Firing sequence->Customised firing options menu to allow you to reselect a blast hole and overwrite the existing surface delay time. This option can be used to modify an existing tie in pattern.
Ticking the option Show parameters for each row from the Firing sequence->Customised firing options menu will display the Edit customised firing sequence parameters form every time a new blast row is started. This form can be used to change the firing parameters for each blast row.
The firing sequence is generated based upon entries in this form. In the case that this option is then un-ticked, then the firing sequence is generated based upon earlier entries in the form.
Blast increment row number
The function BLAST INCREMENT ROW NUMBER increments the row number and then allows you to graphically create a customised firing pattern for the next row with or without displaying the user input form. This function can be invoked only after invoking the function "Blast generate customised firing sequence" at least once.
To run this function: Choose Design > Blast design > Firing sequence > Increment row number, or...