


aCquire import drillholes
With this function you can import drillhole data from acQuire into an existing Surpac database.
To run this function: Choose Database > Database > Import drillholes from acQuire, or...
Fields on the acQuire Import Drillholes form:
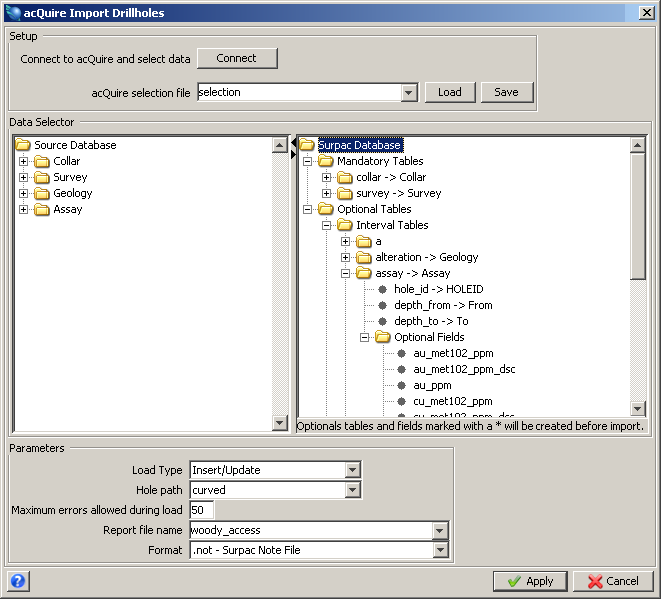
Import of data from acQuire is a two step process.
You need to connect to acQuire and select the data-types and variables from acQuire that you want to load into Surpac.
-
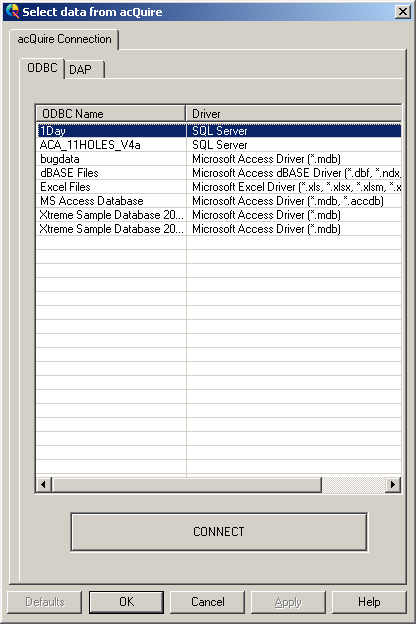
In the acQuire Import Drillholes form, click the Connect button to display the Select data from acQuire form. Consult the acQuire help for detailed documentation of this form:
-
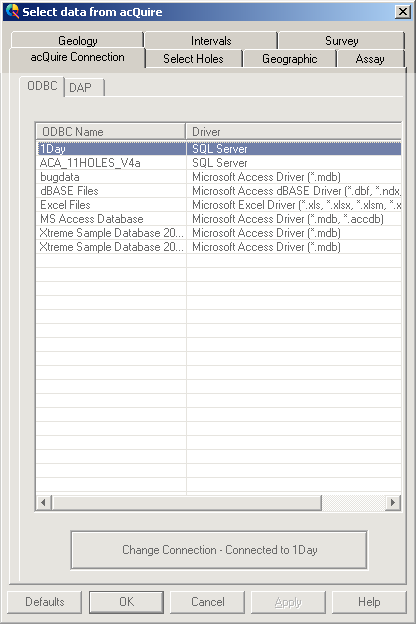
Select the ODBC data source for the acQuire database of interest and click the CONNECT button. The form is populated with tabs that allow selection of the acQuire data of interest:
-
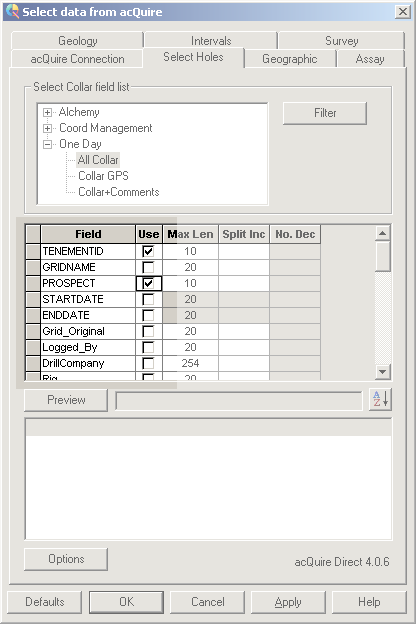
Check the boxes next to the fields of interest. For example to import the collar fields TENEMENTID and PROSPECT:
-
After you have completed selection of the data to import, click OK to return to the acQuire Import Drillholes form.
After you have connected to an acQuire data source and made your selections, you can save them to a selection file by entering the name of the file to save, and click Save. The next time you use ACQUIRE IMPORT DRILLHOLES, you can load the selections by entering the file name and pressing Load instead of manually making the selections:
After you have selected everything you need from acQuire, you will see the chosen fields displayed in a tree. You must now specify where the data from each acQuire field will be stored in the Surpac database.
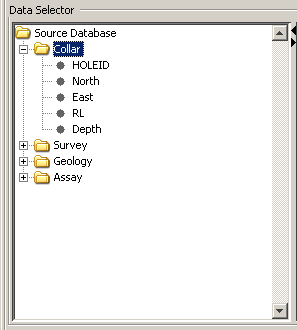
Source Database
The folders of the left hand tree represent the acQuire data to be loaded. If you open one of the folders by clicking on the "+" symbol to the left of the folder, a list of the fields within that table will be displayed:
Surpac Database
The folders of the right hand tree represent the structure of the Surpac Database. This tree is similar to the structure of the acQuire Source Database database tree however everything is split up into mandatory and optional folders as shown:
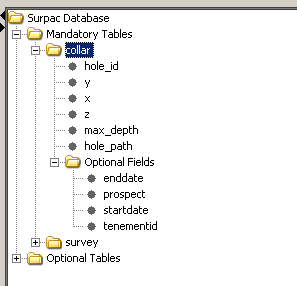
The two folders under the very top folder are labelled "Mandatory Tables" and "Optional Tables". The mandatory tables that Surpac can use to store acQuire data are the 'collar' and 'survey' tables and hence under the "Mandatory Tables" folder are two folders that represent these two tables. If you open one of these tables, you will see a list of the mandatory fields that are required for that table plus a folder labelled "Optional Fields" to specify other fields in the table. Calculated fields are not shown as data cannot be written to a calculated field.
The "Interval Tables", "Point Tables" and "Discrete Tables" folders specify non-mandatory tables in your database.
Mapping an acQuire table to a Surpac table
To indicate a Surpac table that will load data from an acQuire table, you need to map the tables. To do this you must be able to view the folder representing the table in the Source Database tree and the folder representing the table in the Surpac Database tree. Click on the table folder in the Source Database tree with the left mouse button and while this button is still pressed, move the mouse over to the Surpac Database tree and release the mouse button when the mouse pointer is over the folder that represents the table you want to map it to.
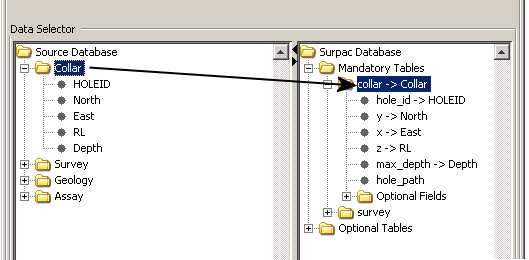
The label of the Surpac folder will be changed and will have the format xxxx -> yyyy where xxxx is the name of the Surpac table and yyyy is the name of the acQuire table that contains the data to load. Some fields may be automatically mapped (for example an acQuire HOLEID maps to a Surpac hole_id) but others will require manual mapping.
Removing a table mapping
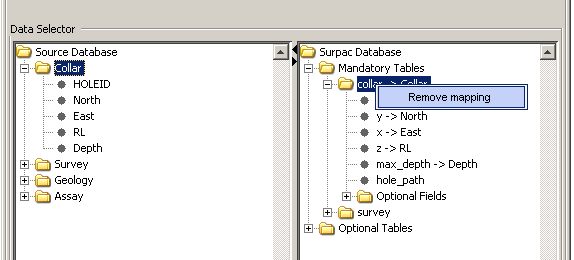
If you want to remove a table mapping, select the Surpac table folder name and right click on the mouse. As shown below, a menu will popup with the option to Remove mapping. Select this item from the menu and the mapping will be removed. If any fields in that table have been mapped, their mappings will be removed as well.
Mapping an acQuire field to a Surpac field
To indicate a Surpac field that will load data from an acQuire field, you need to map the fields. This is similar to mapping a table name. To do this you must be able to view the field name in the Source Database tree and the field name you want to map it to in the Surpac Database tree. Click on the field name in the Source Database tree with the left mouse button and while this button is still pressed, move the mouse over to the Surpac Database tree and release the mouse button when the mouse pointer is over the field name you want to map it to.
The field name label will be changed and will have the format xxxx -> yyyy where xxxx is the name of the Surpac field and yyyy is the name of the acQuire field that contains the data to load.
Removing a field mapping
If you want to remove a field mapping, select the field name and right click on the mouse. A menu will popup with the option to Remove mapping. Select this item from the menu and the mapping will be removed.
The other option is to follow the mapping procedure using the correct name.
Adding an optional acQuire field to a table
If you have mapped one of your acQuire tables to a Surpac table and you want to load data from another acQuire field in that database table, you can add the field to the table folder. To do this you must be able to see the field name in the Source Database tree as well as the folder under the Surpac table folder that is labelled "Optional Fields". Highlight the database field name with a left mouse click and without releasing the mouse button, move the mouse pointer over the "Optional Fields" folder in the Surpac database tree and release it.
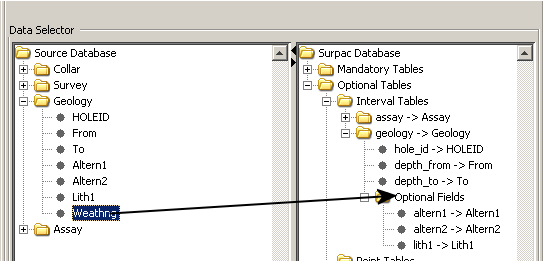
If you open the "Optional Fields" folder you will see the field name you have just added:
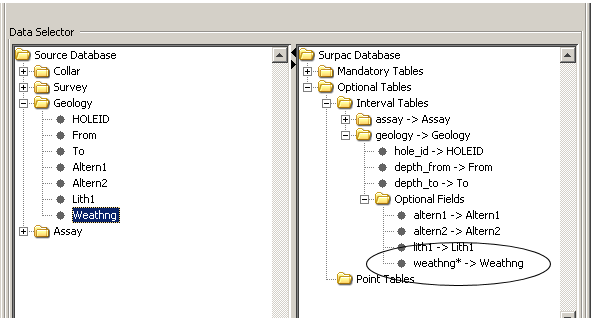
Any new fields you add to the table will be marked with a * to indicate that they will be created before loading data. If you remove the field mapping to a new field, it will be removed from the tree.
Renaming a new field in a table
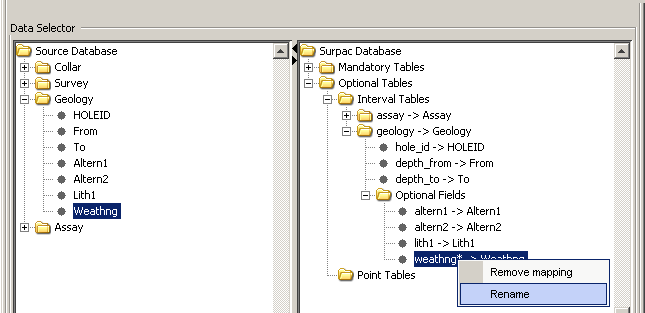
If you want to change the name of a new field (marked with a *) to give it a more meaningful name when Surpac creates the field, you can do so by highlighting the field name and right-clicking on the mouse so that a menu pops up with the option to Rename. Select this from the menu to bring up a form that will allow you to enter in a new name for the field. The label of the field will change and will have the format xxxx* -> yyyy where xxxx is the new name of the field that Surpac recognises and yyyy is the name of the acQuire field that contains the data to be loaded into this field.
Removing a new field in a table
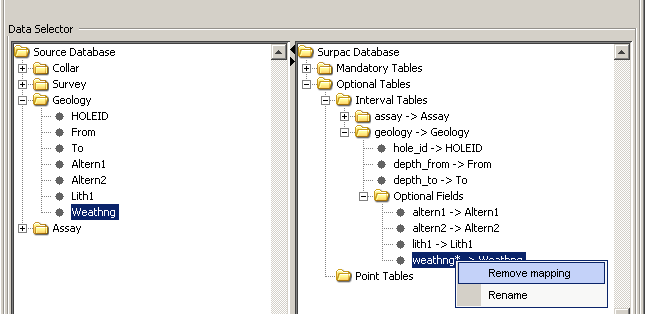
If you decide not to add a new field to a Surpac table, select the field name and right click on it. A menu will popup with the option to Remove mapping. Selecting this will remove the field from the table definition.
Adding a new Interval or Point table to Surpac
Apart from the mandatory tables, you can add other tables to the Surpac Database tree view. There are two folders under the "Optional Tables" folder that allow you to add in new tables according to the type of table you want to add. These folders are labelled "Interval Tables" and "Point Tables". For example, to add an interval table, make sure you can view the table in the Source Database tree and the "Interval Tables" folder in the Surpac Database tree. Select the acQuire table with a left mouse click and while keeping the button pressed move the mouse pointer over the "Interval Tables" folder and release the button. If you open the "Interval Tables" folder, you will see a new folder representing a table that is mapped to the acQuire table you selected.
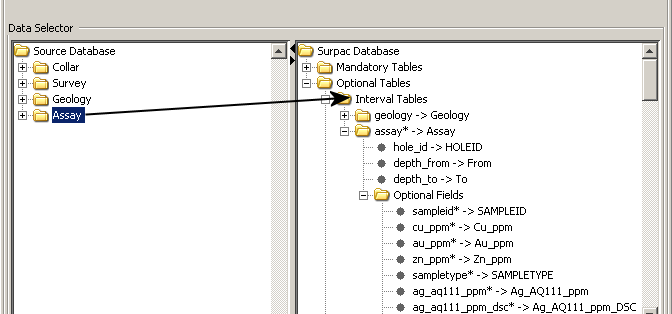
Any new tables you add to the database will be marked with a * to indicate that they will be created before loading data. If you remove the field mapping to a new table, it will be removed from the tree.
Removing a new Interval or Point table
If you decide not to add a new table to the Surpac database, select the table name and right click on it. A menu will popup with the option to Remove mapping. Selecting this will remove the table from the database definition.
Renaming a new Interval or Point table
If you want to change the name of a new table (marked with a *) to give it a more meaningful name when Surpac creates the table, you can do so by highlighting the table name and right-clicking on the mouse so that a menu pops up with the option to Rename. Select this from the menu to bring up a form that will allow you to enter in a new name for the table.
Load Type
Select the type of load from the options Insert, Update, or Insert/Update
- Insert
If you choose an Insert then an insert only load will be performed. This means only records which don't exist in the database table will be loaded with all duplicate and existing records in the text file being rejected.
- Update
If you choose Update then an update only load will be performed. With this style of load only records which already exist will be updated with non existing records being reject.
- Insert/Update
If you choose Insert/Update then an insert and update load will be performed. In this mode records that already exist in the database will be updated and records which don't will be inserted.
Hole path
Select the type of hole path to use. If you map an acQuire field to the hole_path field in the collar table, this value will only be used if a valid value isn't loaded from acQuire. If you don't map an acQuire field to the hole_path field in the collar table, all new collar records will have the specified hole_path.
Maximum errors allowed during load
You can nominate the number of errors that can be encountered during the load before it will abort. This is advisable as it will show problems in the format file, your text files or the data itself. All encountered errors are logged in the report file.
Report file name
During the load operation a report is maintained to record successful table loads and to record errors encountered. This is the name of the report file.
Format
Choose the format of the resultant report. Possible formats include .not - Surpac Note File, .csv - Comma Separated (Spreadsheet), .htm, .html - Hypertext Markup Language (Web), .rtf - Rich Text Format (Microsoft Word), .pdf - Adobe Acrobat and .ps - Postscript.
Apply to form to begin the load process. acQuire will present a confirmation dialog:
Select Yes to load the data or No to return to the acQuire Import Drillholes form.
Error Messages
"You need to connect to an acQuire data source to complete the import." - You need to connect to an acQuire data source using the Connect or Load buttons on the acQuire Import Drillholes form.
"No file name entered. Selection not loaded." - You need to specify a selection file name in order to load a selection file.
"Table 'X' does not exist in database 'Y'" - The ddb file for the current database references a table that does not exist in the database.
"Field 'X' does not exist in table 'Y'" - The ddb file for the current database references a field in the specified table that does not exist.
"You need to map indexed field 'X' in table 'Y' before continuing." - You cannot load data unless all of the indexed fields in the table have acQuire mappings. Map the specified field to continue.
"To playback in a macro, the acQuire interface requires the use of a selection file. Specify the name of an existing selection file when recording the macro." - When you recorded the macro, you didn't specify a selection file. Consequently, the macro cannot connect to acQuire to load data.
"Database not connected" - You need to connect to an existing database to use this function.
"Too many load errors ... Discontinuing load" - The number of errors encountered during the load exceeded the specified maximum number.